Beam Framing Plans and Slab Drawings
Lesson 14 of 32 · 6 min read
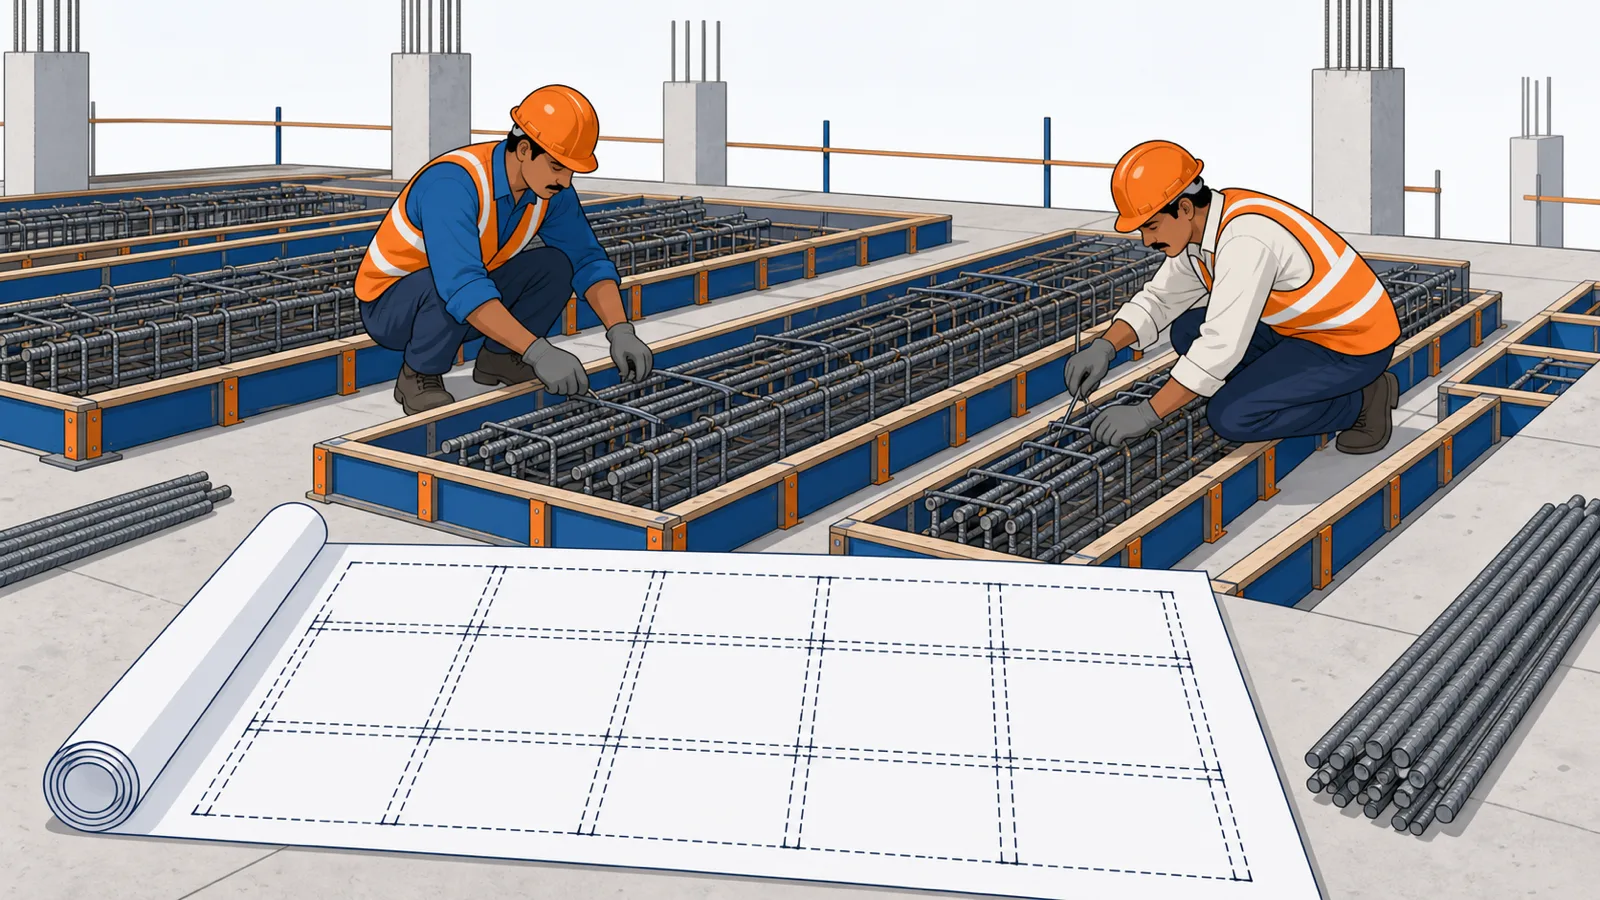
Hand a fresh engineer a framing plan and the first honest reaction is that it looks like a circuit diagram: dashed lines everywhere, brackets full of numbers, letters in circles. Yet this one sheet type answers the questions a site asks most often — how deep is this beam, which slab is this, where is that detail cut from — and it prices more concrete and shuttering than any other drawing in the set. By the end of this lesson the maze reads as three simple vocabularies laid on one grid.
Vocabulary 1 — beam marks
How to read this
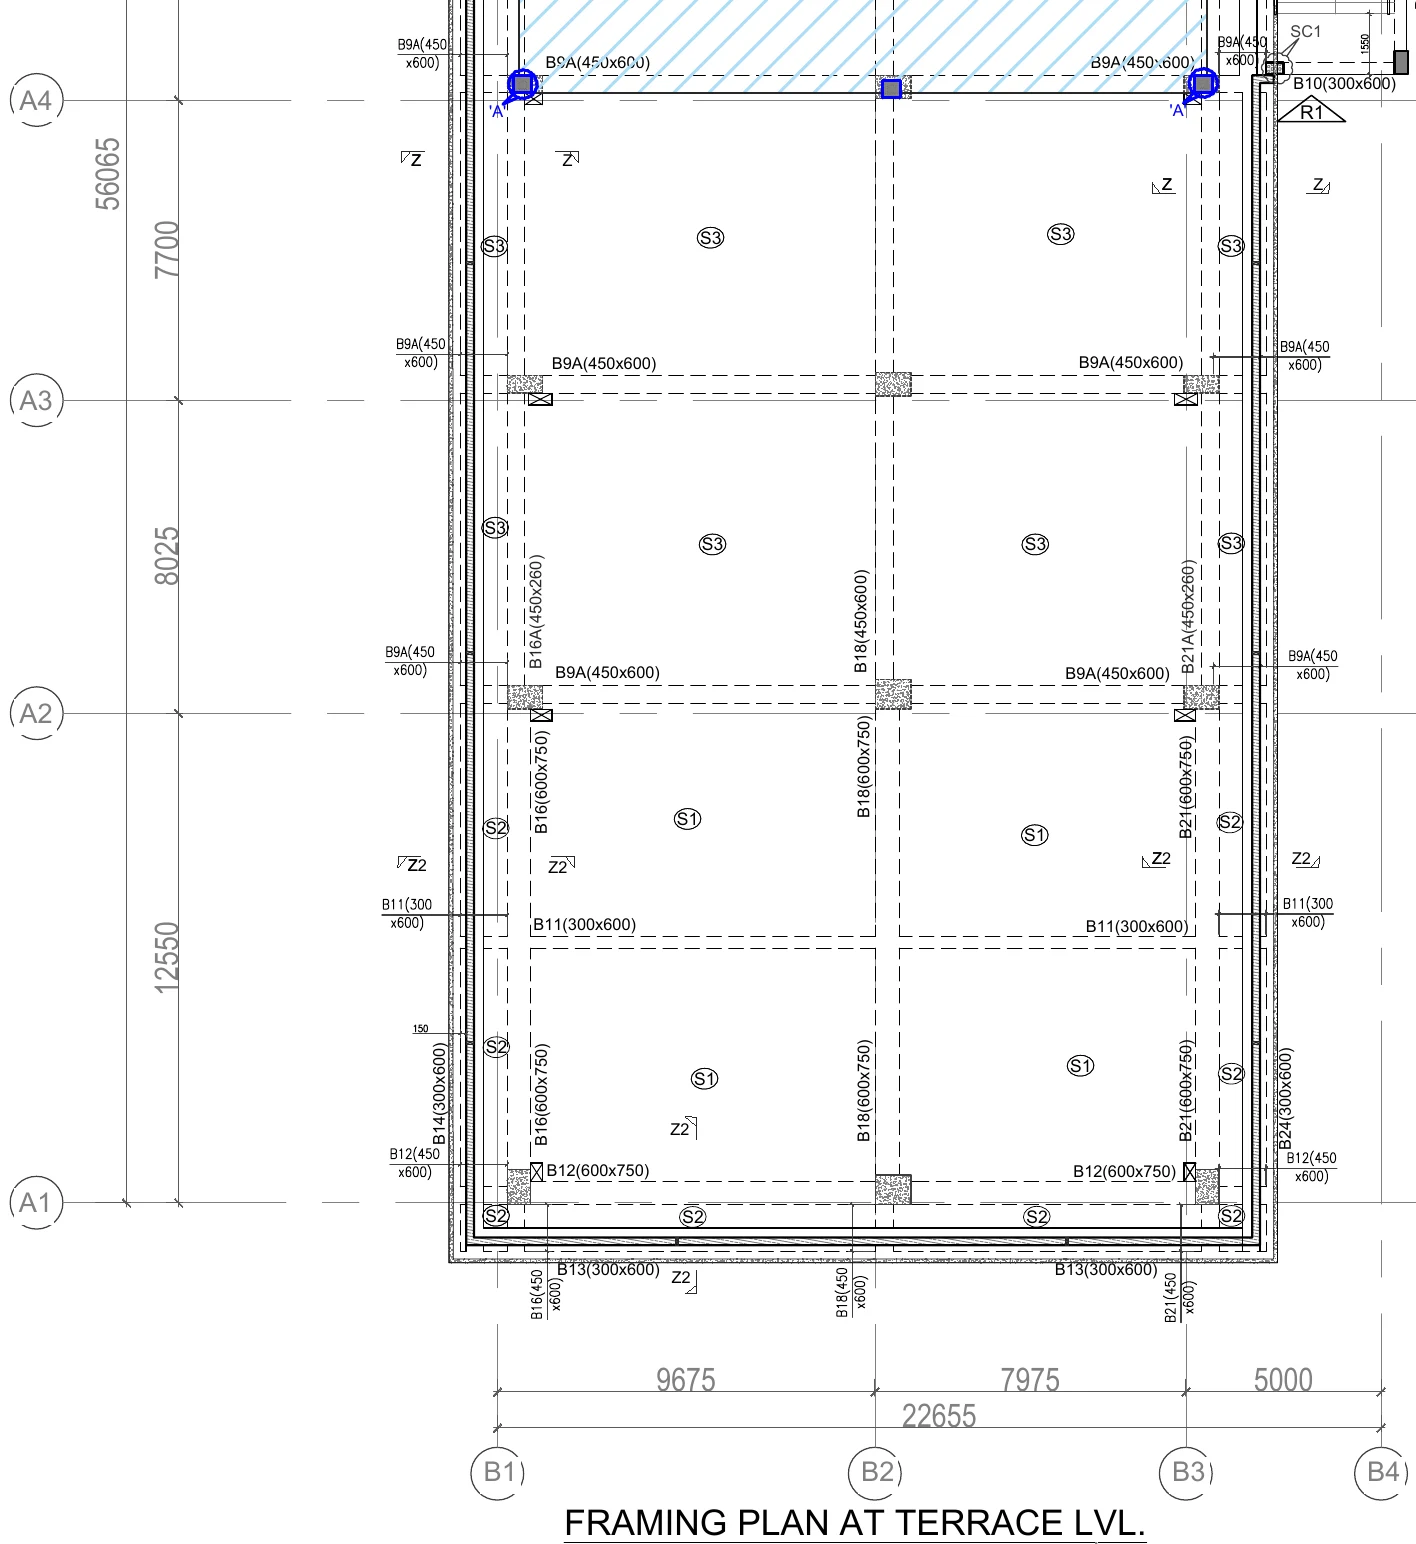
- Pick any beam line: the paired dashed lines are the beam's edges seen through the slab, and the mark — B9A(450x600) — gives width x overall depth in mm.
- Count occurrences per mark: B9A repeats along three gridlines; B12, B16, B18 and B21 appear at (600x750) on the heavy interior lines; B16A and B21A are shallow (450x260) variants. One mark = one design, many locations.
- Read the circled S1, S2 and S3 slab marks in each panel — pointers to the slab schedule, which owns thickness and reinforcement.
- Find the flagged Z markers near the top and the Z2 markers lower down: each shows where a section is cut and which way it looks. Section Z-Z is our next excerpt.
- Anchor the geometry: bays 9675 / 7975 / 5000 across (22655 total) — the spans you will multiply beam sections by when pricing.
Back to Project A's FRAMING PLAN AT TERRACE LVL., now reading it as a structural document rather than a comparison piece. Beams are drawn as paired dashed lines (dashed because the beam hangs below the slab you are looking down through) and every beam carries a mark like B9A(450x600):
- B — beam. 9 — serial number on this level. A — a variant: B9A is a sibling of B9 with some difference (span, bars) that earned it its own mark.
- (450x600) — width x overall depth in mm. On typical Indian sheets the bracketed depth is the overall structural depth including the slab thickness at that location — so a 600 deep beam under a 150 slab projects 450 below the soffit. Convention varies by office; the general notes or a typical section confirms it. Never assume — the difference is the entire beam-side shuttering measurement, as the QS course's shuttering lesson shows.
Scan the excerpt and the same marks repeat: B9A(450x600) on three gridlines, B11(300x600) and B13(300x600) on the lighter lines, B12, B16, B18 and B21 appearing as (600x750) on the heavy interior lines, and the shallow variants B16A and B21A at (450x260). Repetition is information: one mark, one design, many locations — count locations per mark and you are halfway to a quantity takeoff.
Vocabulary 2 — slab marks
The circled S1, S2, S3 tags in each panel are slab marks. Each keys the panel to a slab schedule elsewhere in the set, which gives thickness and reinforcement per mark (module 4 reads a real Schedule of Slab table when we build a BBS). The framing plan deliberately does not repeat that data — it just labels the panel. Same panel-labelling logic as the column schedule: locate here, specify there.
Why three different slab marks on one roof? Because panels of different spans need different designs. Look at the excerpt again: the S1 panels sit in the biggest bays, S2 in the edge strips, S3 in the upper panels — each mark is one design (thickness plus bar sets) repeated wherever its span condition repeats. When a slab is special — sunken for a toilet, depressed for waterproofing, or pierced by a large opening — it either gets its own mark or a local note; the framing plan is also where slab openings for shafts must appear, since a cutout you do not form now becomes a chipping job later. Count panels per mark and you have the slab takeoff structure ready before opening the schedule.
Vocabulary 3 — section flags
The small flagged Z and Z2 markers on the plan are section cuts: the flag's position shows where the knife passes, and its orientation shows which way you look. Follow Z to its detail:
How to read this
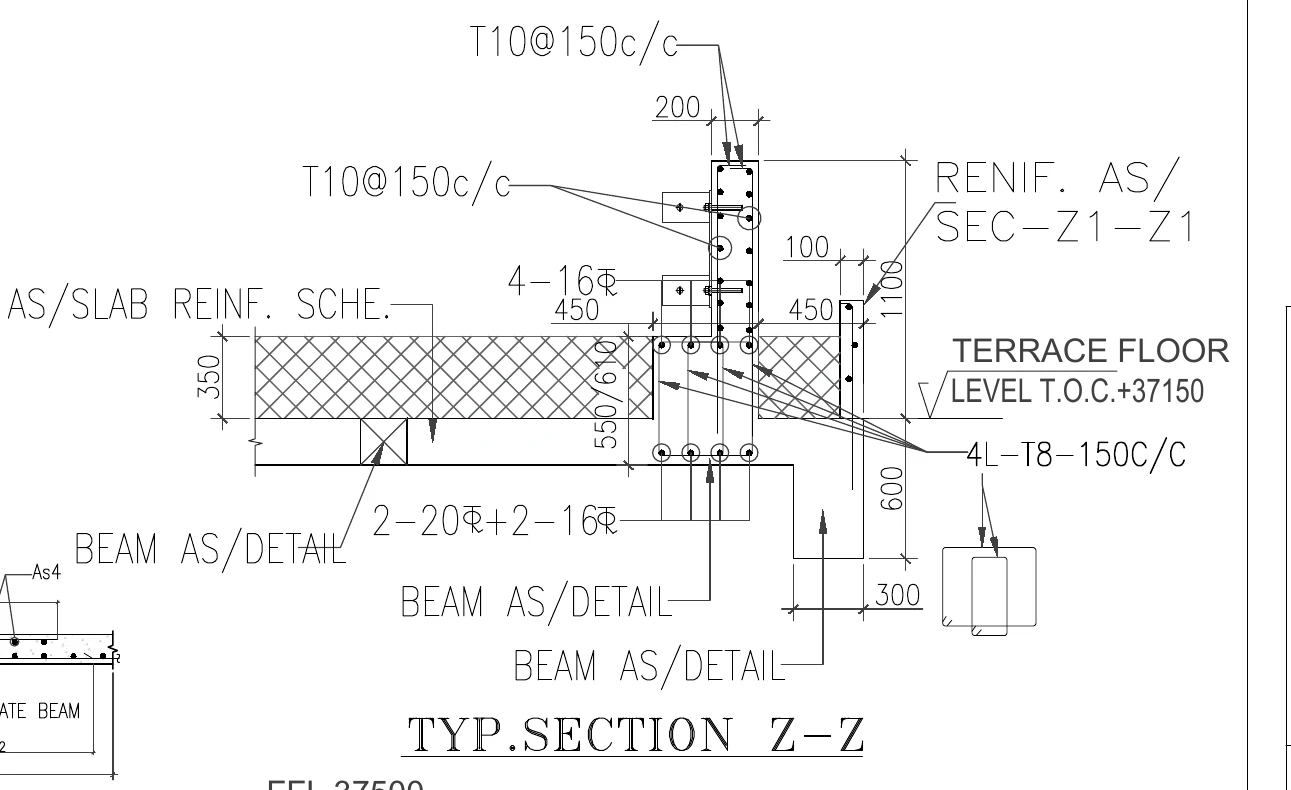
- Orient with the level flag: TERRACE FLOOR LEVEL T.O.C. +37150. T.O.C. is top of concrete — the structural datum every other level on this section hangs from.
- The cross-hatched band is the slab cut through. Its bars are not drawn here: the callout AS/SLAB REINF. SCHE. routes you to the slab reinforcement schedule.
- Three leaders read BEAM AS/DETAIL — the beams' bars live in their own details, and RENIF. AS/SEC-Z1-Z1 routes the upstand's remaining steel to another section. A section is a router; most callouts are addresses.
- Now the steel that IS specified here: T10@150c/c in the 200 wide upstand, 4-16Ø and 2-20Ø+2-16Ø at the junction, and 4L-T8-150C/C — 4-legged 8 mm links at 150 centres.
- Read the owned geometry: the upstand rises 1100 above the slab zone, with the 600 and 300 dimensions shaping the edge below — this outline is what the shuttering carpenter builds.
This is TYP.SECTION Z-Z — the terrace edge, cut live. Orient with the level flag first: TERRACE FLOOR LEVEL T.O.C. +37150. T.O.C. is top of concrete — the structural surface, the same family as SSL. (Lesson 1's architectural terrace, with its screed and falls, sits on top of this very number.)
Now read what the section actually specifies versus what it routes elsewhere — this distinction is the heart of section-reading:
| Callout on Z-Z | What it means |
|---|---|
| AS/SLAB REINF. SCHE. | Slab bars are NOT given here — go to the slab reinforcement schedule |
| BEAM AS/DETAIL (three times) | Beam bars are NOT given here — go to each beam's own detail |
| RENIF. AS/SEC-Z1-Z1 | The upstand's remaining steel — go to section Z1-Z1 |
| T10@150c/c (twice) | Specified here: 10 mm bars at 150 mm centres in the 200 thick upstand |
| 4-16Ø | Specified here: four 16 mm bars at the junction |
| 2-20Ø+2-16Ø | Specified here: two 20 mm plus two 16 mm bars |
| 4L-T8-150C/C | Specified here: 4-legged 8 mm links at 150 mm centres |
A section is a router, not an encyclopaedia: most of its callouts are addresses. The dimensions it does own — the 200 wide upstand rising 1100, the 450s, the 600 and 300 at the edge — are the geometry the shuttering carpenter builds from. Decode 4L-T8-150C/C carefully because it is the standard link syntax: 4 legs, T8 bar, 150 mm centre-to-centre. Module 4 turns these callouts into cutting lengths.
The worked number: pricing one beam line off the plan
The framing plan alone lets you rough-price members. Take one span of B9A(450x600) between grids B2 and B3 — the bay dimension reads 7975:
| Step | Calculation | Result |
|---|---|---|
| Beam section | 0.45 x 0.60 | 0.27 m² |
| Concrete in one span (gross) | 0.27 x 7.975 | 2.15 m³ |
| Indicative M25 RMC cost (mid-2026, Rs. 5,500–7,500/m³) | 2.15 x 5500 to 2.15 x 7500 | Rs. 11,800–16,100 |
Gross, because part of that 600 depth is shared with the slab — the net-of-slab correction, and which item the shared concrete is billed under, is exactly what the QS course's concrete takeoff lesson settles. The point here is the reading skill: mark, size, span, count of occurrences — a framing plan is a priced list wearing a diagram's clothes. Do the same move for shuttering: the beam's two sides and soffit come straight off the mark and span, so the plan you just read is simultaneously the concrete list and the formwork list.
The dispute-protection angle is the same skill inverted. Beam depths on the framing plan are the depths your RA bill's shuttering and concrete quantities must reconcile to, span by span. When a billing engineer claims B18 at 750 deep everywhere but four spans are B18(450x600), the framing plan is the referee — and the engineer who can read it fastest wins the certification argument.
Common mistakes
- Reading beam width and depth in the wrong order. The convention is width x depth; a (600x750) beam is 600 wide. If a value looks structurally absurd, check against the section.
- Forgetting the depth convention. Overall depth including slab vs projection below slab changes shuttering and concrete both; confirm once per project from the notes or a typical section.
- Treating routed callouts as complete. BEAM AS/DETAIL means the section shows the beam's outline, not its steel. Casting from a section alone leaves out most of the reinforcement.
- Missing variant suffixes. B16 and B16A differ by definition — here (600x750) against (450x260), nearly three times the concrete per metre. The suffix is not decoration.
- Ignoring the T.O.C. datum. Every soffit level on this sheet hangs off +37150; shutter to an assumed level and the beam bottoms drift.
What comes next
Beams and slabs cover the horizontal plane; the one element that cuts diagonally across levels is the staircase. Next lesson: reading stair sections — flights, waist slabs, riser-tread arithmetic and a text note that is pure money if you miss it.
Key takeaways
- A framing plan speaks three vocabularies on one grid: beam marks with (width x depth), circled slab marks keyed to a slab schedule, and section flags pointing to details.
- Beams are drawn as paired dashed lines because they hang below the slab; the bracketed depth on typical Indian sheets is overall including slab — confirm the convention once per project.
- Variant suffixes matter: B16(600x750) and B16A(450x260) differ by nearly three times the concrete per metre.
- A section is a router — callouts like BEAM AS/DETAIL and AS/SLAB REINF. SCHE. are addresses, not specifications; only some steel is defined in the section itself.
- 4L-T8-150C/C reads as 4-legged 8 mm links at 150 mm centres — the standard Indian link syntax.
- T.O.C. (top of concrete) is the structural datum; every soffit and shutter level on the sheet is set from it.
Verify on site
- Confirm the project's beam-depth convention (overall vs below-slab) from the general notes before the first beam is shuttered.
- Read every beam's mark AND size at its own location — do not assume a mark's size from another gridline.
- Trace each section flag on the plan to its detail before casting the members it cuts.
- Check soffit levels against the sheet's T.O.C. datum, not against an assumed floor height.
- Verify link legs, diameter and spacing on fixed steel against the section's callout (e.g. 4L-T8-150C/C).
- Reconcile RA-bill beam quantities span by span against framing-plan marks and sizes.
Check your understanding
5 questions. Answering them marks this lesson complete — results stay on your device.
Want the free certificate?
The whole course is free and open — no signup needed to learn. Enter your details only if you want us to track your progress on this device and issue a named certificate after the final assessment.