Architectural vs Structural: Same Building, Different Truth
Lesson 11 of 32 · 6 min read
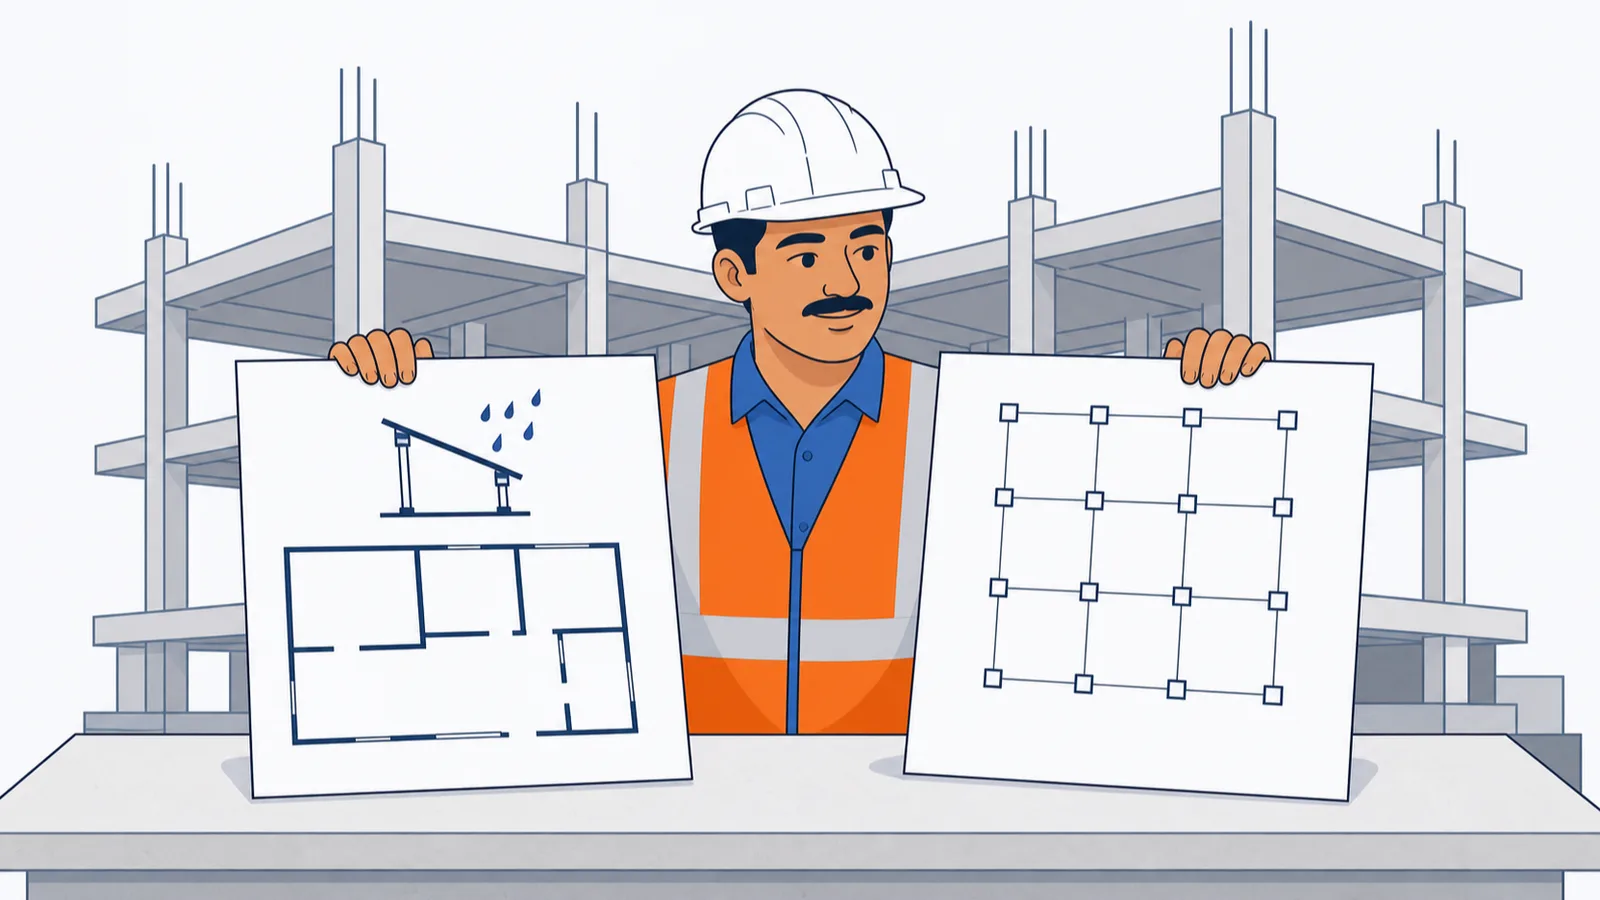
A bar bender on a Pune site once tied the terrace slab steel to the architectural drawing because it was the cleaner print lying in the site office. The architectural terrace plan had everything he did not need — slope arrows, khurra positions, parapet heights — and nothing he did: no beam sizes, no slab marks, no reinforcement. Half a day was lost, and the site engineer who handed over the wrong sheet answered for it. The first skill of structural drawing reading is knowing which family of sheets you are holding and what each family is allowed to tell you.
Two disciplines, two questions
Every framed building carries at least two parallel drawing sets for the same floors:
| Architectural sheets | Structural sheets | |
|---|---|---|
| Core question | How is the space used and finished? | How does the load reach the ground? |
| Levels shown | FFL — finished floor level | SSL / T.O.C. — structural slab top |
| Slab shown as | A floor with finishes, slopes, drains | Panels between beams, with slab marks |
| Walls shown as | Rooms, wall types (W1, W2...), doors | Only shear/core walls that carry load |
| Typical callouts | Tiles, slopes, parapets, waterproofing | Beam marks, column marks, rebar, grades |
| Prepared by | Architect | Structural consultant |
Neither sheet is "the real one". The structure is built from the structural set; everything the user touches comes from the architectural set. The building you hand over is both, stacked: structural concrete first, architectural finishes on top. The gap between the two — the finish zone between SSL and FFL — is exactly where the two sets meet, and module 2 taught you how to read those two level families. This lesson shows the same idea across whole sheets.
One terrace, drawn twice
Both excerpts below come from Project A, a nine-storey commercial tower, and both describe the same terrace level.
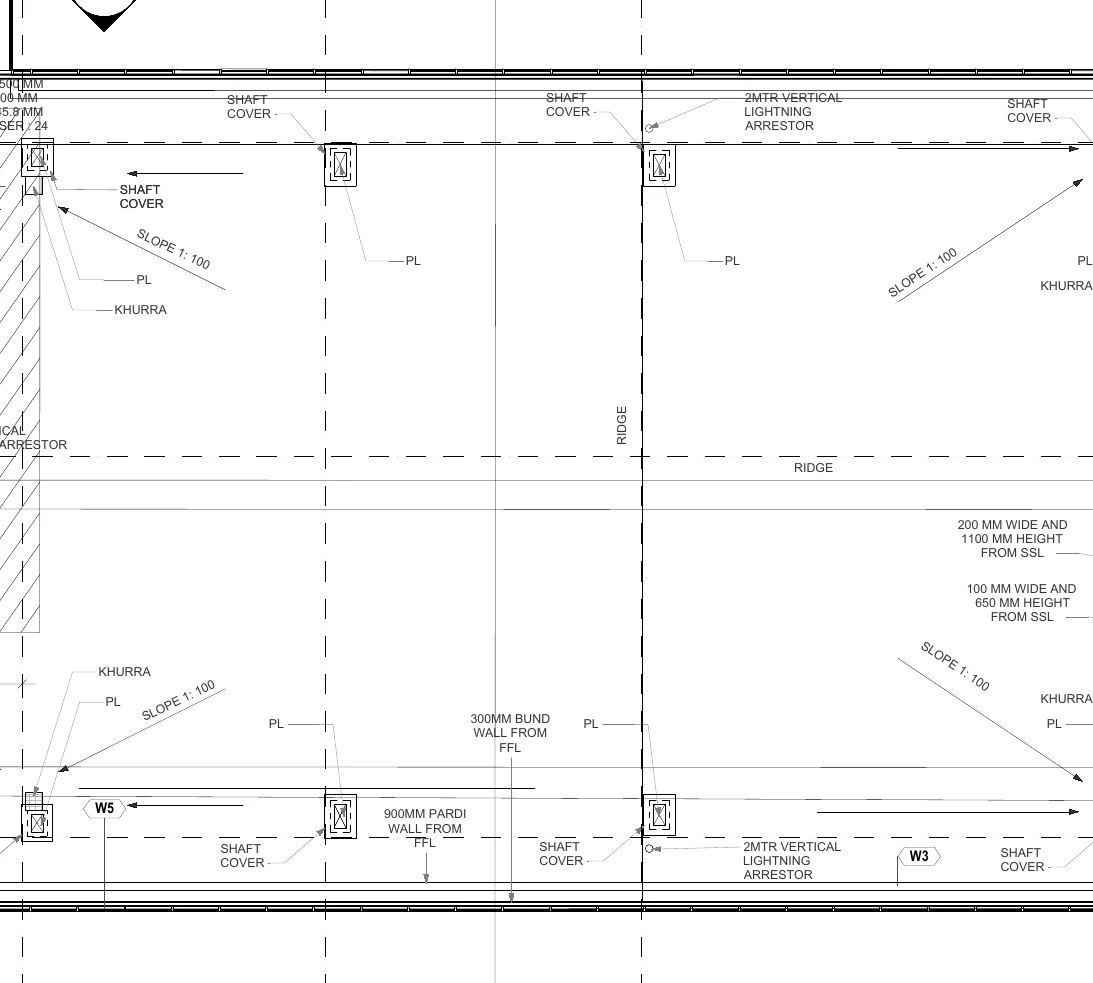
How to read this
- Find the dashed RIDGE lines running across the plan — the high lines of the finished terrace surface, from which water falls away to both sides.
- Follow any SLOPE 1:100 arrow — the arrow points downhill. Over a 7.7 m bay, 1:100 is a 77 mm fall, built in the screed, not in the structural slab.
- The KHURRA tags at the arrow ends mark the dished outlet points where water leaves the terrace. Each sits beside a PL tag — confirm every abbreviation from the sheet legend rather than guessing.
- Read the parapet notes: 300MM BUND WALL FROM FFL and 900MM PARDI WALL FROM FFL fix heights from finished level, while the two openings (200 wide x 1100 high, 100 wide x 650 high) are quoted FROM SSL. Same sheet, both level families — read the suffix every time.
- Spot the repeated SHAFT COVER boxes and the 2MTR VERTICAL LIGHTNING ARRESTOR callouts — service items an architectural roof plan carries that a framing plan never will.
Read what this architectural terrace plan cares about. Dashed RIDGE lines mark the high points of the finished surface. SLOPE 1:100 arrows fall away from the ridges towards KHURRA points — the dished rainwater outlets Indian terraces use. Parapets are specified in words: a 300MM BUND WALL FROM FFL and a 900MM PARDI WALL FROM FFL (pardi is exactly the site word your thekedar will use for the parapet). Two wall openings are sized 200 MM WIDE AND 1100 MM HEIGHT FROM SSL and 100 MM WIDE AND 650 MM HEIGHT FROM SSL — notice the sheet deliberately mixes FFL and SSL references, so you must read the suffix every single time. Shaft covers and a 2MTR VERTICAL LIGHTNING ARRESTOR complete the picture. This sheet exists so the waterproofing, screeding and plumbing teams know what to build on top of the slab.
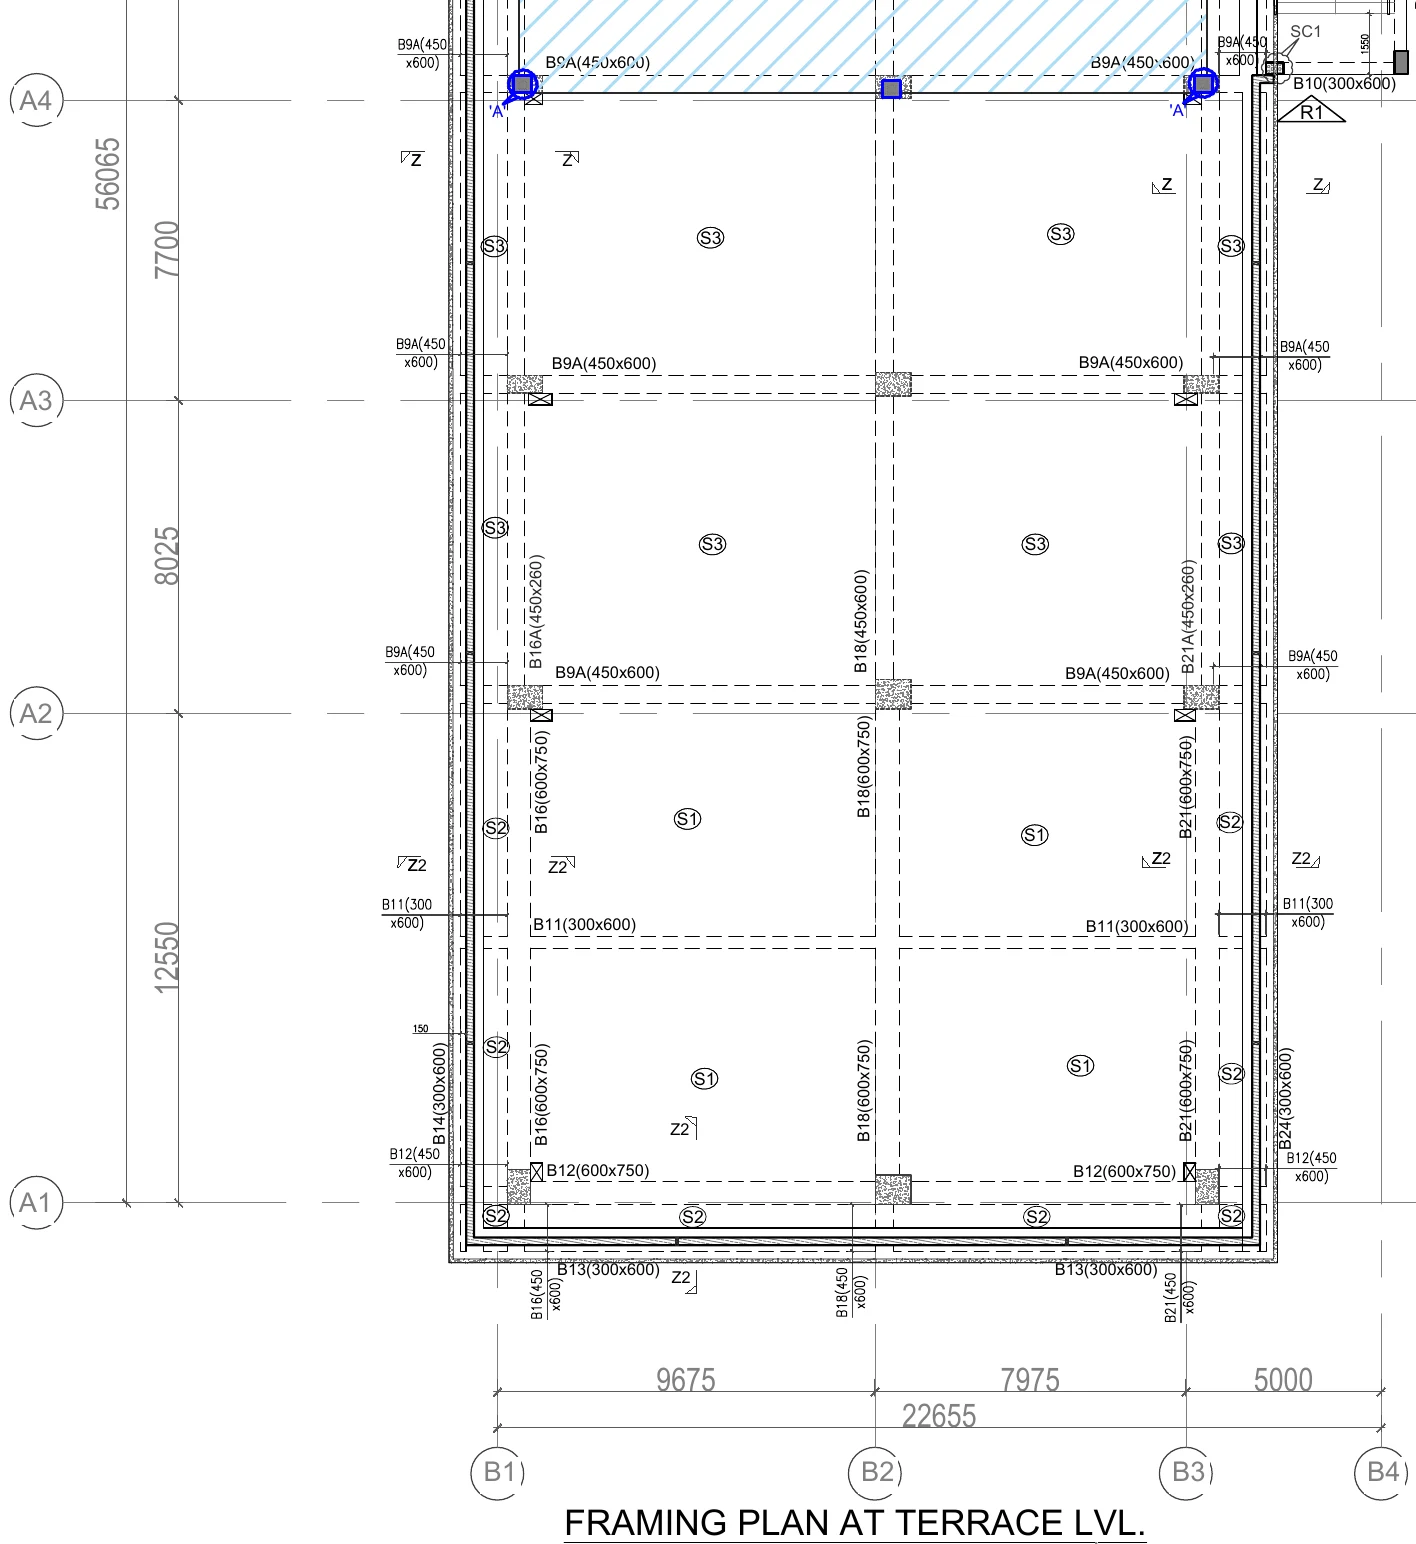
How to read this
- Orient with the grid bubbles: A1 to A4 up the left edge, B1 to B4 along the bottom, under the title FRAMING PLAN AT TERRACE LVL.
- Read the dimension chains: bays of 9675, 7975 and 5000 total 22655 along the bottom; 12550, 8025 and 7700 stack up the left side.
- Every beam line carries a mark and size in brackets — B9A(450x600) repeats along three gridlines, B12(600x750) sits near grid A1, B18(600x750) runs up the middle.
- The circled S1, S2 and S3 tags in each panel are slab marks — pointers to a slab schedule elsewhere in the set, exactly as beam marks point to beam details.
- The small flagged Z and Z2 markers are section cuts. In the beam-and-slab lesson we follow section Z-Z into the detail it references.
Now the structural answer, titled FRAMING PLAN AT TERRACE LVL. Grid bubbles A1–A4 climb the left edge and B1–B4 cross the bottom, with chained bay dimensions — 9675, 7975 and 5000 totalling 22655 across, and 12550, 8025, 7700 stacking upward. Every beam line carries a mark and size: B9A(450x600) repeats across three gridlines, B12(600x750) sits near grid A1, B18(600x750) runs up the middle of the plate. Circled S1, S2 and S3 tags in each panel are slab marks pointing to a slab schedule. Small flagged Z and Z2 markers are section cuts. There is not one word here about slope, khurras or parapet heights — structurally this slab is flat, and the entire 1:100 fall you saw on the architectural sheet lives in the screed above it.
The worked number: where did the slope go?
This is the classic coordination question, and it is worth working through because it is also a costing question.
The architectural plan says SLOPE 1:100. Take the panel between grids B1–B2 and A3–A4: 9.675 m by 7.7 m, with the fall running along the 7.7 m direction.
| Step | Calculation | Result |
|---|---|---|
| Fall over the panel | 7700 / 100 | 77 mm |
| Screed at the outlet end (assumed minimum) | — | 25 mm |
| Screed at the ridge end | 25 + 77 | 102 mm |
| Average screed thickness | (25 + 102) / 2 | 63.5 mm |
| Panel area | 9.675 x 7.7 | 74.5 m² |
| Screed volume, this panel alone | 74.5 x 0.0635 | 4.73 m³ |
At an indicative mid-2026 screed concrete cost of Rs. 4,500–6,000 per m³ placed (site-mixed; always use your city's current rates), that is roughly Rs. 21,000–28,000 in one panel — and it appears on no structural drawing. If you priced this roof from the framing plan alone, you missed it entirely. If you measured slab concrete up to the architectural finished level, you double-counted it. IS 1200 treats structural concrete and screed/finishes as separate items measured separately; the two drawing families are the reason why.
Which sheet governs what
When the two sets disagree — and on live projects they regularly do — the working rule on Indian sites is:
- Member sizes, reinforcement, grades, structural levels: the structural sheet governs. An architect's wall shown 150 thick does not change a 200 thick shear wall.
- Positions of finishes, openings tied to use, room dimensions, finished levels: the architectural sheet governs, provided the structure can accept them.
- Neither of you decides. A genuine clash — a khurra draining into a beam, a door hitting a column — is an RFI to the consultants, in writing, before casting. Module 1 covered the discrepancy clauses that general notes carry; they almost always say the contractor must report conflicts, not resolve them. Cast first and ask later, and the rework is yours.
That written RFI is also your payment protection. A recorded query with the consultant's reply is the difference between "extra item, please certify" and an argument you lose in the final account.
Common mistakes
- Setting out structure from architectural prints. Architectural plans dimension to finished faces (plaster included); structural plans dimension to concrete. The 20–40 mm difference is invisible until the shutter is fixed.
- Reading FFL where you needed SSL. On this project's terrace the finish zone is a real 350 mm build-up; pour to the wrong level and you either bury the waterproofing budget or stand proud of every door.
- Assuming the newest-looking sheet is the right discipline. Check the sheet number prefix (A- vs S- or ST-) and the title before anything else.
- Treating the architectural sheet as optional. The khurra positions decide where the screed dips; sleeves and inserts for services must be cast into the structural slab at positions only the architectural and services sheets know.
What comes next
You can now tell the two families apart and know which one answers which question. The rest of this module lives inside the structural set, following the load path downward-up: foundations first, then columns and their schedules, then beams and slabs, then stairs, and finally the general notes sheet — where, as you will see, a surprising amount of your money hides.
Key takeaways
- Architectural sheets answer how space is used and finished (FFL world); structural sheets answer how load reaches the ground (SSL / T.O.C. world).
- The same terrace is drawn flat on the framing plan and sloped 1:100 on the architectural plan — the fall lives in the screed, a separately measured and priced item.
- Member sizes, reinforcement and grades are governed by the structural set; finish positions and finished levels by the architectural set.
- A clash between the two sets is an RFI in writing before casting — never a site-level judgement call.
- Setting out structure from architectural prints imports plaster-inclusive dimensions into concrete work — a 20–40 mm error you find only at the shutter.
Verify on site
- Check the sheet number prefix and title before using any print — architectural and structural sheets of the same floor look alike at arm's length.
- Confirm which level family every level tag belongs to (FFL vs SSL / T.O.C.) before transferring it.
- Keep the current architectural AND structural sheet of the floor being cast on site together — sleeves, inserts and drops come from the architectural/services side.
- Before slab casting, walk the architectural plan for khurras, sunken portions and openings that must be formed in the structural pour.
- Log any architectural-vs-structural conflict as a written RFI with sheet numbers and revisions quoted.
Check your understanding
5 questions. Answering them marks this lesson complete — results stay on your device.
Want the free certificate?
The whole course is free and open — no signup needed to learn. Enter your details only if you want us to track your progress on this device and issue a named certificate after the final assessment.