Checking Steel on Site Against the Drawing
Lesson 20 of 32 · 7 min read
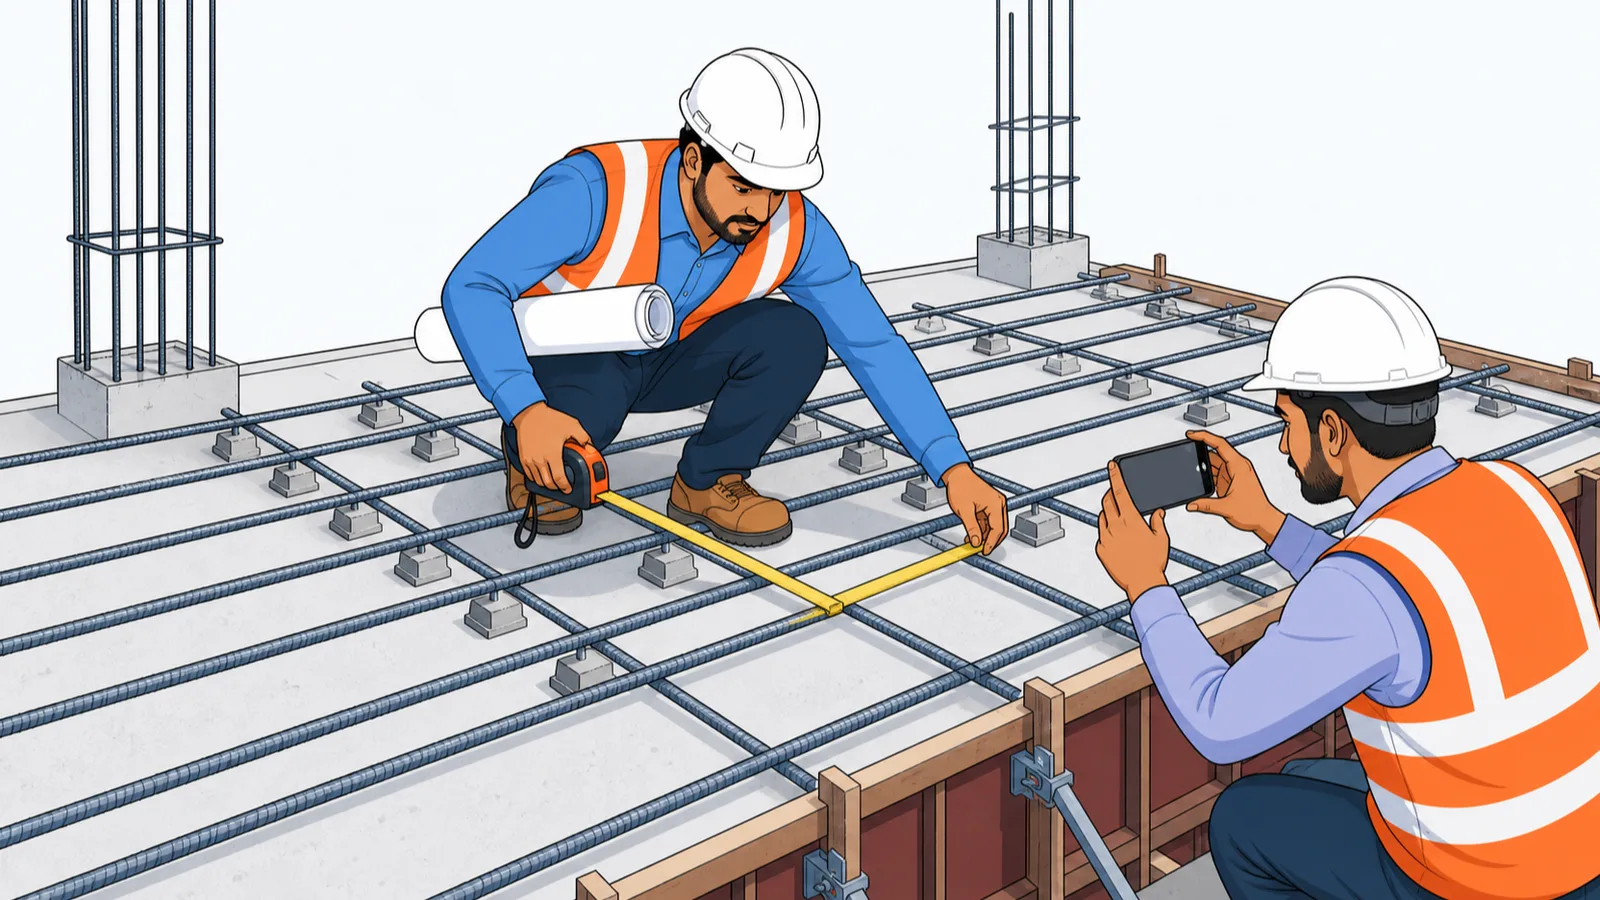
Concrete is the most unforgiving deadline in construction: the moment it flows, every steel error becomes permanent, invisible, and expensive to litigate. Yet most site "checking" is a glance from the slab edge — bars exist, therefore steel is fine. This lesson replaces the glance with a 20-minute routine that checks fixed steel against the sheet, in the order errors are actually found, with the numbers that let you accept, reject, or record. It is the module's payoff: everything you decoded in the last three lessons becomes a checklist you can run tomorrow morning.
The seven checks, in working order
- Diameter — is the bar what the callout says?
- Count — are all groups present (through bars, extras, both layers)?
- Spacing — measured over several spaces, not eyeballed over one?
- Cover — blocks of the right thickness, actually under the bars?
- Laps — long enough for the dia and grade, staggered, in the drawn positions?
- Hooks and bends — 135° into the core where the drawing says so?
- Extras at openings and junctions — trimmers, diagonal bars, the steel everyone forgets.
Run them with three tools: the GFC sheet (current revision — Module 5 covers why), a steel tape, and a phone camera with date stamp.
Diameter: ribs, tape and the weighbridge
Deformed bars are hard to tell apart at a glance — a tied T16 and T20 look similar from standing height. Check the size rolled onto the bar, or measure where it matters (a support zone reading 3-T25(EX) deserves a caliper). For delivered steel the decisive check is mass per metre: cut a sample (IS 1786 requires at least 0.5 m for a valid mass check), weigh it, and compare against d²/162.
The verified IS 1786 tolerances on nominal mass:
| Nominal size | Batch tolerance | Individual sample (min) |
|---|---|---|
| Up to and including 10 mm | ±7% | −8% |
| Over 10 up to 16 mm | ±5% | −6% |
| Over 16 mm | ±3% | −4% |
Worked check: a 1.0 m sample of "16 mm" bar weighs 1.46 kg. Nominal is 16²/162 = 1.580 kg/m; the individual-sample floor is 1.580 x 0.94 = 1.485 kg. At 1.46 kg the bar fails — 7.6 percent light. On a 2-tonne delivery billed at nominal section weight, that rolling margin is roughly 150 kg — Rs. 8,700 at an indicative mid-2026 Rs. 58/kg — paid for steel that never arrived. Weigh a bundle at the weighbridge against count x 12 m x d²/162 before unloading becomes acceptance; the steel reconciliation format linked below tracks this delivery by delivery.
Spacing: count spaces, not bars
The universal spacing error is measuring one gap between two bars — the fixer straightens that gap while you watch. Instead, lay the tape across the mat and read the length over many spaces:
Worked check: the drawing says T10@150 C/C. Your tape spans 10 bars in 1,800 mm. Ten bars bound 9 spaces, so actual spacing = 1800/9 = 200 mm. Steel provided is 150/200 = 75 percent of design — a silent 25 percent shortfall that a one-gap check would have passed. The honest arithmetic also protects the contractor: over-tight fixing (spacing under the drawn value) is his steel donated free, and a documented spacing check settles both directions. Record it as a photo of the tape on the mat with the sheet number in frame.
Cover: the cheapest defect to prevent
Cover blocks must match the drawing's cover — IS 456 prescribes nominal covers by exposure and member (commonly on the order of 20 mm for slabs, 25 mm beams, 40 mm columns, 50 mm footings; your general notes govern). Check that blocks exist under the bottom layer (not just at edges), that side cover to stirrups is held, and that top steel sits on chairs rather than trodden into mid-depth. Cover failures do not appear in any bill — they appear as rust streaks and spalling in year six, when the flat is under a RERA defect-liability claim and someone pulls the pour photographs.
Laps and hooks on the fixed cage
From Lesson 2 you know what a lap must be; on the mat, check three things: length (tape it — a 16 mm tension lap at the 50d convention is 800 mm; 620 mm of overlap is not "almost right", it is 22 percent short), stagger (adjacent bars must not lap at the same section — Project B's wall standard details bind alternate staggered laps on every wall of the job), and position (bottom laps near supports, top laps near midspan, per your typical detail). Then hooks: seismic stirrup and tie ends must be 135° with a 10d extension (minimum 75 mm), turned into the concrete core — that is the IS 13920 definition of a hoop. A field of 90° hooks is visible from the slab edge and is exactly the defect that opens up in an earthquake; it photographs well, which is the point.
The steel everyone forgets: openings
How to read this
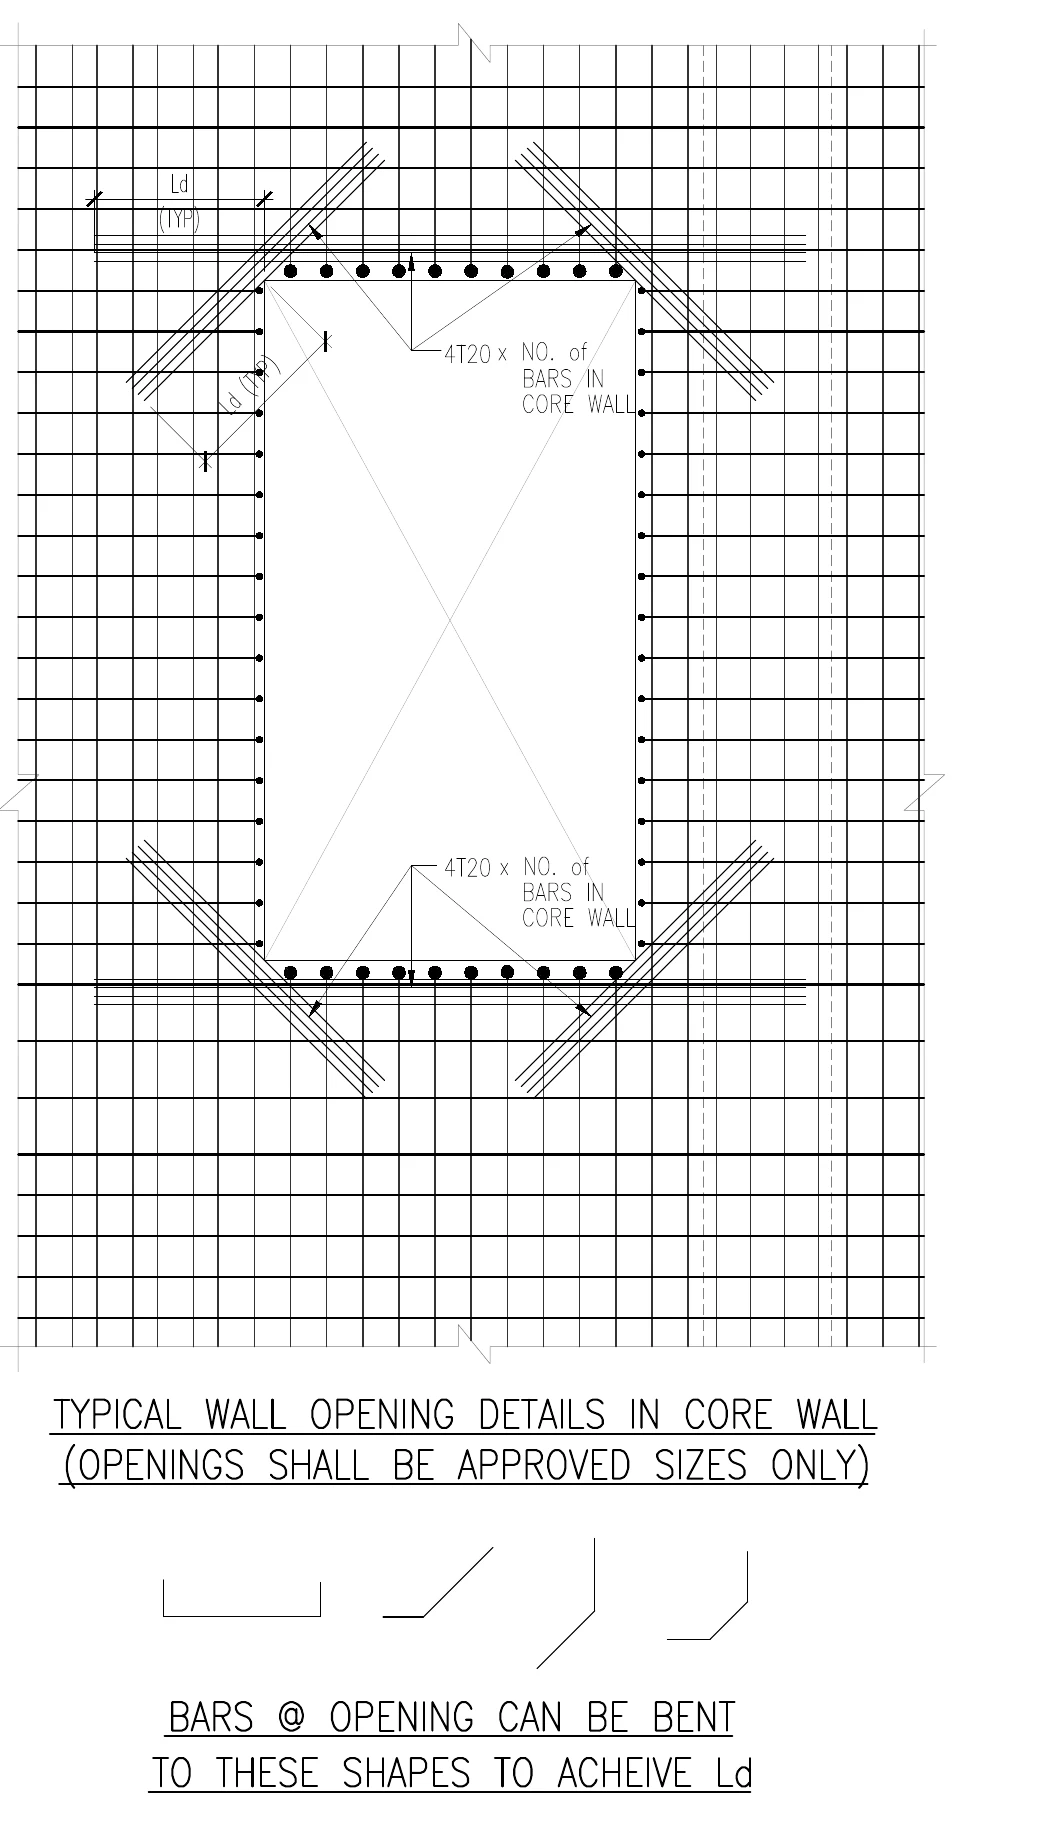
- Read the title under the drawing: TYPICAL WALL OPENING DETAILS IN CORE WALL, with the bracketed rule (OPENINGS SHALL BE APPROVED SIZES ONLY) — this detail covers approved openings, not ad-hoc site cuts.
- The fine grid is the core-wall mesh; the crossed rectangle is the opening interrupting it.
- The callouts 4T20 x NO. of BARS IN CORE WALL point to the bars framing the top and bottom edges — their count is tied to the wall bars the opening interrupts.
- At each corner, bundles of diagonal bars run across the re-entrant corner, with Ld (TYP) dimensions on their extensions — corner cracks are what these bars prevent.
- The shapes at the bottom, under BARS @ OPENING CAN BE BENT TO THESE SHAPES TO ACHEIVE Ld (typo as printed), permit bending where a straight extension will not fit inside the wall.
Project B's typical detail shows what must happen wherever an opening interrupts a core wall. The wall mesh stops at the opening, so the detail adds 4T20 bars framing the top and bottom edges — the callout 4T20 x NO. of BARS IN CORE WALL ties their count to the wall bars they replace — plus diagonal bars across each corner with their Ld (TYP) extensions dimensioned, because corners of openings are where cracks start. The bracketed note is contractual: OPENINGS SHALL BE APPROVED SIZES ONLY — the detail covers approved openings, not whatever a services contractor cuts later. And the bottom menu of bent shapes says bars at the opening can be bent to these shapes to achieve Ld where straight length does not fit (the sheet spells it ACHEIVE — real drawings carry real typos; read for meaning, flag for record).
On site this is the highest-yield single check of the routine: MEP sleeves and door openings are formed after the wall mesh is tied, and the trimmer and diagonal bars — small, short, unglamorous — are the marks most often missing from both the cage and the thekedar's BBS. Check every opening against the typical detail before closing shutters: edge bars present in the drawn count and dia, diagonals at all corners, extensions achieving Ld (bent to a permitted shape where space is tight).
The paper trail that wins disputes
Every check above ends the same way: a dated photo, the sheet and revision number, and a line in the pour card — steel checked against S-sheet Rev / by / date. Under RERA-era documentation discipline this record cuts both ways and protects whoever holds it: the owner against invisible shortfalls, the contractor against back-charges for defects that were never his. Reconcile monthly: BBS issued vs steel delivered (weighbridge) vs steel fixed (your checks) vs scrap returned. The format below does the bookkeeping; the QS course lessons Steel and BBS Basics and BBS for a Slab and a Beam supply the quantities it reconciles against.
Common mistakes
- Checking spacing over one gap instead of taping across many spaces.
- Accepting delivered steel at nominal weight without a weighbridge or sample check against IS 1786 tolerance.
- Passing 90° stirrup hooks because the spacing was right — hook angle is a separate, visible check.
- Ignoring openings cut after the mesh was tied — no trimmer bars, no diagonals, no record.
- Checking against a superseded revision — the steel can perfectly match a sheet that no longer governs (Module 5 takes this on).
- Checking without recording — an unphotographed check settles nothing six months later.
Where this module leaves you
You can now read any rebar callout in either dialect, convert sections and details into cutting lengths, turn schedules and band callouts into a traceable BBS, and prove — with a tape, a camera and the sheet — that the steel in the shutters is the steel in the drawing. Module 5 turns to the drawings themselves changing underneath you: revisions, clouds, and the discipline of the current GFC.
Key takeaways
- Check fixed steel in a fixed order — dia, count, spacing, cover, laps, hooks, openings — against the current GFC revision, and record every check.
- Verify diameter by mass: a sample of at least 0.5 m against d²/162, judged by IS 1786 tolerances (batch ±7/±5/±3 percent; individual −8/−6/−4 by size band).
- Measure spacing across many spaces: bars minus one is the divisor, and 10 bars in 1,800 mm means 200 C/C, not 'about right'.
- Tape lap lengths and confirm stagger and position — 620 mm on a 16 mm bar at the 50d convention is 22 percent short, not 'almost'.
- Stirrup and tie hooks must be 135° with a 10d (min 75 mm) extension into the core — 90° hooks are a visible, photographable defect.
- Openings formed after mesh-tying are where steel goes missing: check trimmer bars, corner diagonals and Ld extensions at every opening before shutters close.
Verify on site
- Carry the current-revision sheet, a steel tape and a date-stamped camera to every steel check.
- Weigh one sample bundle per delivery at the weighbridge against count x 12 m x d²/162 before acceptance.
- Tape at least one 8–10 space run per mat direction and compute actual spacing.
- Lift a corner of the mat visually: cover blocks under bottom steel, chairs under top steel.
- Tape every lap you can reach in the pour area; confirm stagger against the wall/beam standard detail.
- Walk every opening and sleeve: edge trimmers, corner diagonals, extensions per the typical detail.
- Photograph each check with the sheet number in frame and log it on the pour card before concrete is ordered.
Check your understanding
5 questions. Answering them marks this lesson complete — results stay on your device.
Want the free certificate?
The whole course is free and open — no signup needed to learn. Enter your details only if you want us to track your progress on this device and issue a named certificate after the final assessment.