Reading a Floor Plan End to End
Lesson 5 of 32 · 8 min read
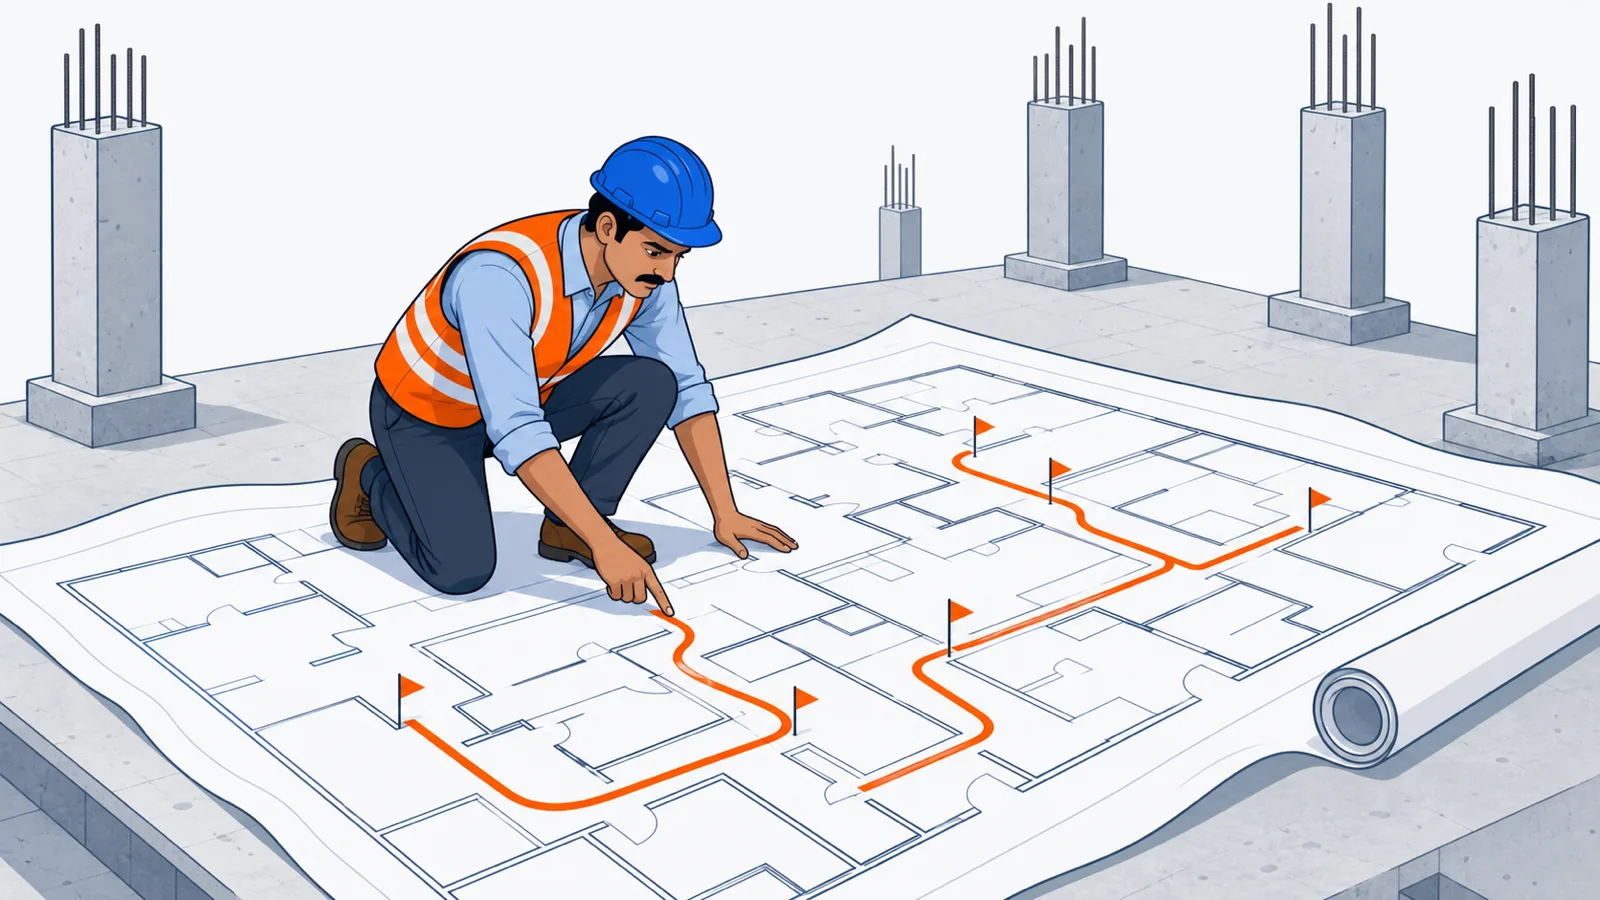
Put a dense floor plan in front of an untrained reader and their eyes wander: a label here, a dimension there, and after ten minutes they know some things but not whether they know the important things. The cure is a method - a fixed sequence of passes, each looking for one category of information, so nothing depends on where your eye happens to land. This lesson gives you a seven-pass method and then runs it, live, over two real sheets from Project A, the nine-storey commercial tower.
The seven passes
- Title block and revision - what sheet is this, and is it current? (Lesson 3.)
- Orientation - key plan, north point, grid references: where am I in the building? (Lesson 1; grids get a full lesson in module 2.)
- Overall dimensions - the big chain of numbers: how large is this floor plate, and do the parts add to the whole?
- Levels - every FFL marker: how many distinct levels live on this "one floor"?
- Walls and tags - wall types, door tags, what the legend says they mean. (Lesson 4.)
- Annotations and provisions - the leader-line notes: sleeves, cutouts, steps, provisions for other trades.
- Areas and cross-checks - stated areas, and the arithmetic that ties passes 3-6 together.
Ten focused minutes, every sheet, same order. Now watch it work.
Walkthrough 1: six shops on a lower-ground floor
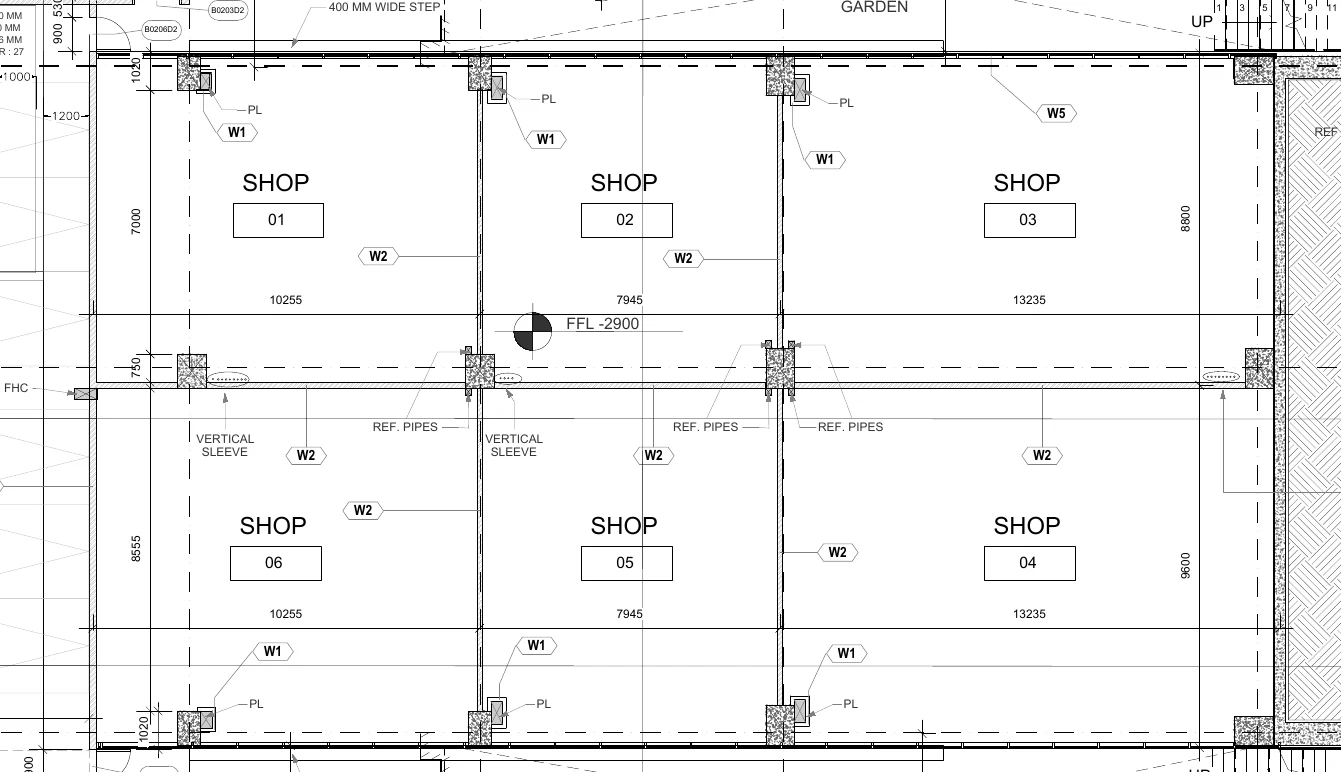
How to read this
- Frame the plate with pass 3: bay widths across the top row read 10255, 7945, 13235 - totalling 31,435 mm - and the same three numbers repeat under the bottom row of shops.
- Find the level: the split-circle marker in the central corridor reads FFL -2900. The stair sheet of this same project put lower ground at FFL -3000 - two levels on one floor, reconciled by steps (note the 400 MM WIDE STEP text at the top edge).
- Map the units: SHOP 01, 02, 03 run across the top and SHOP 06, 05, 04 return along the bottom - so 06 faces 01 across the corridor.
- Read the wall tags: hexagons W1 and W2 repeat along the shopfronts and partitions, with W5 at the top right - each keyed to the wall legend; PL tags mark plumbing points.
- Now the money notes in the corridor band: VERTICAL SLEEVE (twice) and REF. PIPES (three times) - cast-in provisions for tenant AC refrigerant routes. Missed sleeves become core-drilling through finished RCC.
- Sweep the margins last: the FHC tag at the left edge (fire-hose cabinet in most legends - confirm in this set's legend) and the hatched wall zone at the far right complete the picture.
This is a run of retail units on a lower-ground level of Project A. Passes 1-2 are cropped away (you did them on the full sheet); we pick up at pass 3.
Pass 3 - dimensions. Across the top row of shops the bay dimensions read 10255, 7945, 13235. Sum: 10255 + 7945 + 13235 = 31,435 mm - about 31.4 m of shopfront. The same three numbers repeat under the lower row of shops: the two rows mirror each other across the corridor. Depths read 7000 and 8555 on the left edge, 8800 and 9600 on the right, with the corridor band at 750 plus wall zones of 1020 - the plate is deeper on the right than the left. You have not "checked" anything yet; you have built the frame the rest of the reading hangs on.
Pass 4 - levels. First, make sure you can read the symbol itself:
One level marker governs the crop: FFL -2900, sitting in the central corridor band. Now recall lesson 2: the stair sheet of this same project put the lower-ground floor at FFL -3000. Both are lower-ground readings on one project - which means this "one floor" holds more than one finished level, and something - a step or ramp - must reconcile them. And there it is at the top edge of the crop: a note reading 400 MM WIDE STEP. On split-level floors, hunting down every FFL marker is not optional: a screed poured to the wrong one of two plausible levels is jackhammer work.
Pass 5 - walls and tags. The shopfronts and partitions carry hexagon wall tags - W1 and W2 repeating along both rows, W5 at the top right - each keyed to the wall legend (module 2 reads one in full). PL leader tags mark plumbing points along the front walls. Different tag, different wall build-up, different cost per metre: when you later bill this blockwork, the tags are what separate the items.
Pass 6 - annotations. The corridor band carries the notes that make this sheet money-relevant: VERTICAL SLEEVE (twice) and REF. PIPES (three times) - refrigerant-pipe routes and cast-in sleeves so each shop's future AC can reach its outdoor unit without breaking the structure later. (The stair sheet in lesson 2 showed a row of ODU boxes on this same level - these provisions are that system's plumbing.) An FHC tag at the left margin marks a fire-hose cabinet in most legends - confirm in this set's legend. Miss a sleeve before casting and the tenant's AC contractor will core-drill through your finished RCC at Rs. 800-1,500 per cut (indicative mid-2026), plus a structural-approval argument nobody enjoys.
Pass 7 - cross-checks. The mirrored bay dimensions (top row vs bottom row) agree; the shop numbering runs 01, 02, 03 across the top and returns 04, 05, 06 along the bottom - so unit 06 sits opposite unit 01, not beside 05 across the corridor from 03. Anyone scheduling handovers or billing shop-by-shop needs exactly that little map.
Walkthrough 2: the entrance lobby and its area statement
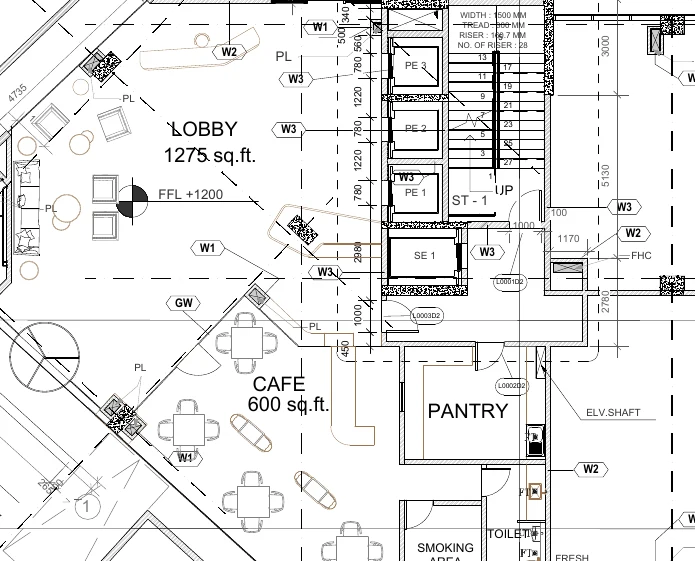
How to read this
- Start with the level: the marker in the lobby reads FFL +1200 - identical to the GROUND FLOOR FFL. +1200 flag on SECTION Q-Q from lesson 2. Cross-sheet agreement is your five-second coherence check.
- Read the area statements printed under the room names: LOBBY 1275 sq.ft. and CAFE 600 sq.ft. Treat them as claims to verify against the dimensioned plan, not as measurements.
- Locate the vertical core: passenger lifts PE 1, PE 2, PE 3, service lift SE 1, the ELV.SHAFT label, and stair ST - 1 with its boxed spec (width 1500 mm, 28 risers) and odd riser numbers climbing past 27.
- Note the support spaces around the core: PANTRY, TOILET and SMOKING AREA labels behind the lift bank.
- Read the tags: wall hexagons W1, W2, W3 and GW on the glazed lobby line, plus oval door tags of the L0002D2 pattern keyed to the door schedule.
- Finish with furniture and finishes context: the drawn cafe tables and lobby seating are layout indications - useful for intent, never a substitute for the dimensions.
Ground floor now, same building - the entrance level. Same passes, faster:
- Levels: the lobby carries FFL +1200 - matching, to the millimetre, the GROUND FLOOR FFL. +1200 flag you read on SECTION Q-Q in lesson 2. Two different sheets, two different drawing types, one consistent level: that agreement is your evidence the set is coherent, and checking it took five seconds.
- Rooms and cores: LOBBY, CAFE, PANTRY, TOILET and SMOKING AREA labels; three passenger lifts tagged PE 1, PE 2, PE 3, a service lift SE 1, an ELV.SHAFT, and stair ST - 1 with its own boxed spec (width 1500 mm, 28 risers) and riser numbering climbing 1, 3, 5... past 27.
- Tags: wall hexagons W1, W2, W3 and GW (a glazed type - confirm in the legend), plus oval door tags of the L0002D2 pattern keyed to the door schedule.
- Areas - the pass that touches money: the plan states LOBBY 1275 sq.ft. and CAFE 600 sq.ft. printed under the room names.
Convert, because bills and leases will: 1 sqm = 10.764 sq.ft.
| Space | Stated area | In sqm |
|---|---|---|
| Lobby | 1,275 sq.ft | 118.4 sqm |
| Cafe | 600 sq.ft | 55.7 sqm |
| Together | 1,875 sq.ft | 174.2 sqm |
Now attach money. Flooring these two spaces in vitrified tile at an indicative Rs. 180 per sq.ft supplied-and-fixed (mid-2026, tier-1 city; use your quotations) is 1,875 x 180 = Rs. 337,500. If the stated area overstates the measurable area by just 2%, that is Rs. 6,750 of phantom flooring in one small zone - and area statements repeat on every floor of every project. The discipline: printed areas are claims, not measurements. Verify against the dimensioned plan before areas enter any bill or agreement.
One more India-specific layer. Since RERA (2016), residential sale runs on carpet area - defined in the Act as the net usable floor area excluding external walls, service-shaft areas, exclusive balconies and open terraces, but including internal partition walls. A drawing's room-area statement is not automatically that carpet area: it may be measured to different faces entirely. Whether you are a buyer's engineer checking a flat, or a site engineer certifying a tile contractor's bill against "area as per drawing", the protection is the same dated document: your own measurement, marked on a copy of the plan, kept with the bill. Areas are where drawings and money meet - measure, then sign.
The habit that makes it stick
Seven passes feel slow for exactly one week. After that, they compress into a ten-minute routine that catches what matters: the stale revision, the second FFL hiding on a split-level plate, the sleeve note that saves a core-drill, the area statement 2% richer than the room. Print the loop, tape it inside the site-office drawing rack, and run it on every new sheet until the sequence is muscle memory. If you also work the estimating side, the QS course's lesson on working drawings (/learn/qs-foundations/reading-working-drawings) shows where these same passes feed a quantity takeoff.
Common mistakes
- Reading area labels as measurements. They are statements to verify against dimensions - especially before they enter a bill or an agreement.
- Stopping at the first FFL marker. Split-level floors are routine in Indian commercial and hillside work; find every marker, then find the steps and ramps that connect them.
- Skimming leader-line notes. VERTICAL SLEEVE and REF. PIPES are two-word notes worth thousands of rupees each once concrete is poured.
- Trusting tags from memory. W2 here is defined here. Check the legend per set - always.
- Reading rooms in random order. Without a fixed sequence you cannot know what you have not yet read. The method is the safety net.
What comes next
You can now control a drawing set, move between plans, sections and elevations, interrogate a title block, obey the fine print and read a floor plan methodically. Module 2 sharpens the technical core: scales you can actually trust, grid lines and setting out, the SSL/FFL system behind the level markers you met today, and the full symbol vocabulary of an Indian drawing set.
Key takeaways
- Read every plan in seven fixed passes - revision, orientation, dimensions, levels, walls, annotations, areas - so nothing depends on where your eye lands.
- One floor plate can hold multiple FFLs: the Project A shops sit at -2900 while the same project's lower-ground stair starts at -3000, reconciled by a 400 mm step.
- Bay dimensions must add up and mirror: 10255 + 7945 + 13235 = 31,435 mm on both sides of the shop corridor.
- Two-word notes like VERTICAL SLEEVE and REF. PIPES are cast-in provisions worth Rs. 800-1,500 per avoided core-cut - never skim leader lines.
- Printed area statements (LOBBY 1275 sq.ft) are claims to verify: a 2% overstatement on one small flooring package was worth Rs. 6,750 in the worked example.
- RERA's carpet-area definition (usable area including internal partitions, excluding external walls, shafts, balconies, terraces) rarely equals a drawing's room-area label - measure before money moves.
Verify on site
- Run the seven passes in order on the next new sheet that reaches site - time yourself; target ten minutes.
- Find every FFL marker on the plan and list the distinct levels; then find the step or ramp connecting each pair.
- Add each dimension chain and compare against the overall - flag any chain that does not close.
- Highlight every leader-line provision note (sleeves, cutouts, inserts) and confirm each exists in the shuttering before pour.
- Verify one printed area statement by computing it from the plan's dimensions before it enters any bill.
- Cross-check one level or dimension against a second sheet (section or adjacent plan) for set coherence.
- Mark your measured areas on a dated copy of the plan and file it with the related bill or agreement.
Check your understanding
5 questions. Answering them marks this lesson complete — results stay on your device.
Want the free certificate?
The whole course is free and open — no signup needed to learn. Enter your details only if you want us to track your progress on this device and issue a named certificate after the final assessment.