Symbols, Hatches and Line Types That Carry Meaning
Lesson 9 of 32 · 7 min read
Hand a plan to someone who has never read one and they see decoration: some lines thick, some dashed, some patterns filled in, little circles with letters. Every one of those marks is vocabulary. The thick line is a wall being cut; the dashed line is something overhead; the cross-hatch is a slope; the quartered circle is a level. Drawings are dense because they compress a specification into graphics — and the compression is only useful if you can decompress it. This lesson gives you the core graphic vocabulary, then reads two real artifacts with it.
Line types: four you must know
Indian architectural drafting convention (IS 962 codifies line work at this level) uses line weight and pattern together:
| Line | Looks like | Means |
|---|---|---|
| Thick continuous | heavy solid | elements CUT by the plan/section plane - walls, columns at the cutting height |
| Thin continuous | light solid | edges you SEE beyond the cut - furniture, fixture outlines, floor edges |
| Dashed | - - - - | hidden or overhead items - a beam above, a canopy, a loft, foundation below |
| Chain (dash-dot) | -- . -- . | centrelines and grid lines - reference geometry, nothing physical |
The plan-cut convention explains the weights: a floor plan is a horizontal cut through the building roughly a metre above the floor. Whatever the knife passes through is drawn heavy; whatever lies below the cut and visible is light; whatever is above the cut but important is dashed. Once you internalise the knife, line weights stop being decoration and start being depth information.
Hatches: patterns with assigned meanings
A hatch is a repeating fill pattern. It carries meaning in two different ways, and confusing them is a real site error:
- Material conventions in section — broadly standardised: diagonal parallel lines for brickwork, a denser variant for concrete (often with aggregate dots), grouped diagonal strokes for earth, close verticals for finish screeds. IS 962 provides conventional representations of common materials; offices adapt them.
- Area coding on plans — project-specific: a pattern is assigned a meaning ON THIS SHEET via a legend. A cross-hatch might mean a slope zone, a raised plinth, an area excluded from scope — the pattern itself tells you nothing until the legend speaks.
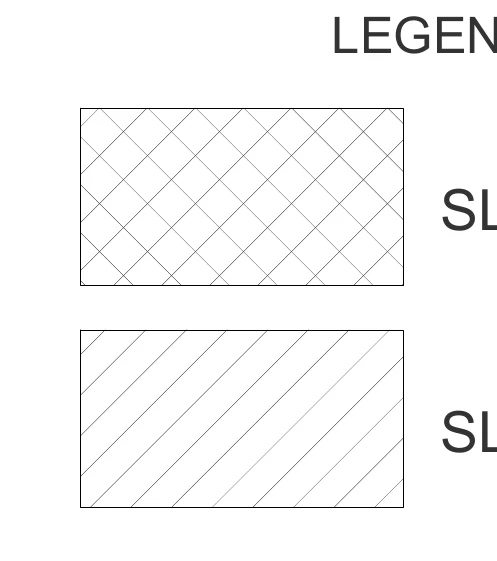
Here is a real area-coding legend, from the ramp sheet of Project A:
How to read this
- Read the heading: LEGEND (partially clipped in this crop) - the decoder ring for patterns used on this sheet.
- Swatch 1: a diamond cross-hatch. This exact pattern fills the ramp surface in the previous lesson's excerpt, under the label SLOPE 1:8.6.
- Swatch 2: a single-direction diagonal hatch - visually close to swatch 1, but a different pattern mapped to the sheet's other slope zone.
- Note both labels begin SL... (SLOPE) but the values sit beyond the crop edge - on site you would read them off the full sheet before pouring any screed.
- The lesson: two similar hatches on one sheet carry two different meanings, and only this sheet's legend - not memory or another project - defines them.
Two swatches: a diamond cross-hatch and a single-direction diagonal hatch, each mapped to a slope callout (the label text is clipped at the edge of this crop, but you have already seen the mapping in action — the previous lesson's ramp surface carries exactly this cross-hatch under the label SLOPE 1:8.6, and the sheet's second pattern flags its other gradient, 1:9.5, per the course's excerpt index). The point survives the clipped text: two visually similar hatches on one sheet mean two different slopes. A screed contractor who pours the 1:8.6 profile across the other zone creates a ramp that ponds water or overshoots its landing — and the only defence is the thirty seconds it takes to find the legend. Never import a hatch meaning from another sheet, another project or memory.
Symbols: the recurring cast
Beyond lines and hatches, a small cast of symbols repeats on every Indian project:
- CL / centreline mark — a C over an L on a chain line; positions fixtures and openings by their centres (you saw them over the washbasin and WC in the accessible-toilet detail).
- Level marker — the quartered circle from the previous lesson, with SSL/FFL values.
- Section cut marker — the flagged line-and-arrow that says "a section is cut here, see view Q-Q" (Module 1 covered these).
- Door swing arc — quarter-circle showing leaf and swing direction.
- North arrow — orientation; every plan should carry one.
- Tag bubbles — circles/boxes holding codes (TL 2, HD-1, D2, W3...) that a legend or schedule resolves. The next lesson is entirely about these.
Reading a real symbol-dense artifact: mounting heights
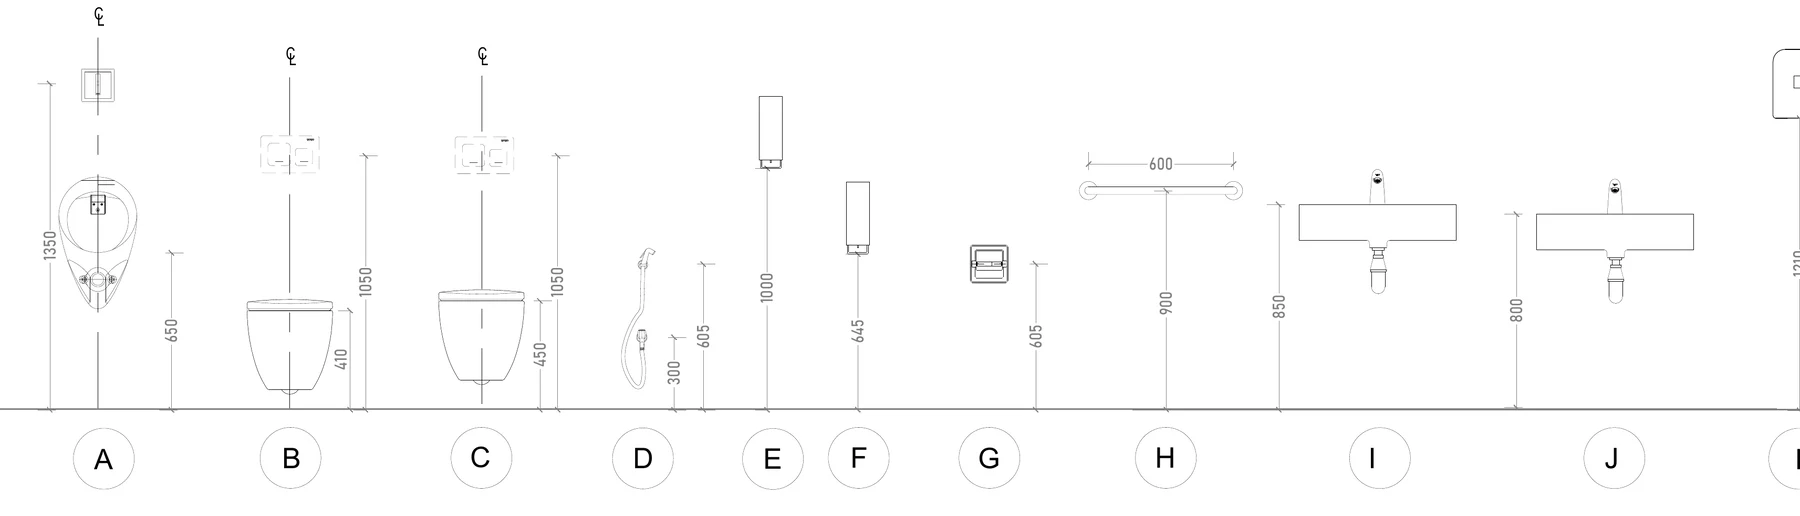
The densest everyday use of this vocabulary is the fixture mounting-height elevation — the sheet every plumber, electrician and finisher works from. Here is Project A's sanitary row:
How to read this
- See the common horizontal line under every fixture: the finished floor. Every height dimension on this row is measured from FFL.
- Fixture A: a urinal with a CL mark - rim at 650, its flush unit above at 1350.
- Fixtures B and C: wall-hung WCs on centrelines - flush plates at 1050, seat heights 410 and 450.
- Fixture D: the health faucet set low at 300 with its hook at 605; E, F and G are wall accessories at 1000, 645 and 605.
- Fixture H: a grab bar 600 long mounted at 900; I and J are washbasins with rims at 850 and 800.
- Site conversion: on bare slab, add the finish package (50 on this project) to every value - the basin's 850 becomes a mark at 900 above SSL.
Fixtures lettered A to J stand on a common line — the finished floor. Every height is therefore measured off FFL, which connects directly to the last lesson: heights off FFL, fixed while only the structural slab exists, must have the finish package added. The visible numbers:
| Ref | Fixture (as drawn) | Height off FFL |
|---|---|---|
| A | urinal - rim 650, flush unit above at 1350 | 650 / 1350 |
| B, C | wall-hung WCs - flush plates 1050, seats 410 and 450 | 1050 / 410-450 |
| D | health faucet set low, its hook above | 300 / 605 |
| E, F, G | dispensers and holders on the wall | 1000 / 645 / 605 |
| H | grab bar, 600 long, at 900 | 900 |
| I, J | washbasins - rims 850 and 800 | 850 / 800 |
(For calibration: India's accessibility guidance generally places WC-side grab bars around 800–900 mm and basin rims near 800–850 mm — the drawn values sit in the expected band, but the drawing governs for this project.)
Worked example: fixing heights before the floor exists
Plumbing rough-ins happen on bare slab, months before tile. Convert every FFL-based height to an SSL-based site mark by adding the finish package (50 mm on this project, from the level ladder):
| Fixture height off FFL | + finish 50 | Mark above SSL |
|---|---|---|
| WC flush plate 1050 | +50 | 1100 |
| Washbasin rim 850 | +50 | 900 |
| Urinal rim 650 | +50 | 700 |
| Grab bar 900 | +50 | 950 |
A plumber who marks 850 for the basin directly on the bare slab delivers a basin 50 mm low after tiling. The rework — re-fixing a ceramic basin, re-doing the wall tile around its brackets, naka-rate mason and plumber for a day — runs ₹2,000–4,000 per fixture at indicative mid-2026 rates, and a commercial toilet core has dozens of fixtures. The prevention is one line in your work instruction: "heights are off FFL; add 50 for finish; FFL = SSL + 50 in this zone."
Protecting your bill
Symbol literacy is dispute protection because graphics are contractual: a hatch legend that says a zone slopes at 1:8.6 binds the screed contractor who priced it flat; a mounting-height sheet signed into the work order defines what "fixed correctly" means at joint measurement time. Photograph rough-ins against the marked heights before tiling closes the wall — a dated photo of a flush-plate conduit at 1100 above SSL is the cheapest arbitration document you will ever produce.
Common mistakes
- Reading hatches from memory instead of the sheet's legend — area-coding hatches are project-specific.
- Ignoring line weight — treating a dashed overhead beam as a wall on the floor creates phantom rooms.
- Measuring symbol positions to the graphic instead of the CL mark — fixtures are located by centreline, not by the edge of the drawn pot.
- Fixing FFL-based heights on bare slab without adding the finish package — the 50 mm basin error above.
- Assuming two similar hatches are the same — on the ramp sheet, cross-hatch and diagonal hatch are two different slopes.
What this sets up
You can now decode lines, patterns and the recurring symbols. One family of symbols deserves its own lesson: the tag — the little coded bubble (D2, W3, SE) whose meaning lives in a schedule. That pairing of tag and schedule is next.
Key takeaways
- A floor plan is a horizontal cut: thick lines are cut elements, thin lines are seen edges, dashed lines are hidden or overhead, chain lines are reference centrelines and grids.
- Material hatches in section are broadly standard, but area-coding hatches on plans mean only what THIS sheet's legend says - never import meanings from memory.
- Two similar hatches on one sheet can encode two different things - on the ramp sheet, cross-hatch and diagonal hatch are two different slope ratios.
- Fixture positions read from CL centreline marks, and mounting heights read off FFL - on bare slab, add the finish package to every height before marking.
- Signed mounting-height sheets and dated photos of rough-ins at marked heights are cheap, decisive dispute protection at billing and handover.
Verify on site
- Find and read the legend of every new sheet before interpreting any hatch or tag on it.
- Confirm with the drawing whether each dashed element is overhead (beam, canopy) or below (foundation) before setting out around it.
- Mark fixture positions from CL marks, not from the edges of drawn fixtures.
- Convert all FFL-based mounting heights to SSL-based marks by adding the zone's finish package, in writing, before rough-in.
- Photograph every concealed rough-in against its marked height before tiling or closing walls.
- Cross-check slope-hatched zones against their spot levels before screeding.
Check your understanding
5 questions. Answering them marks this lesson complete — results stay on your device.
Want the free certificate?
The whole course is free and open — no signup needed to learn. Enter your details only if you want us to track your progress on this device and issue a named certificate after the final assessment.