Dimensions, Levels, FFL and SSL Without Confusion
Lesson 8 of 32 · 8 min read
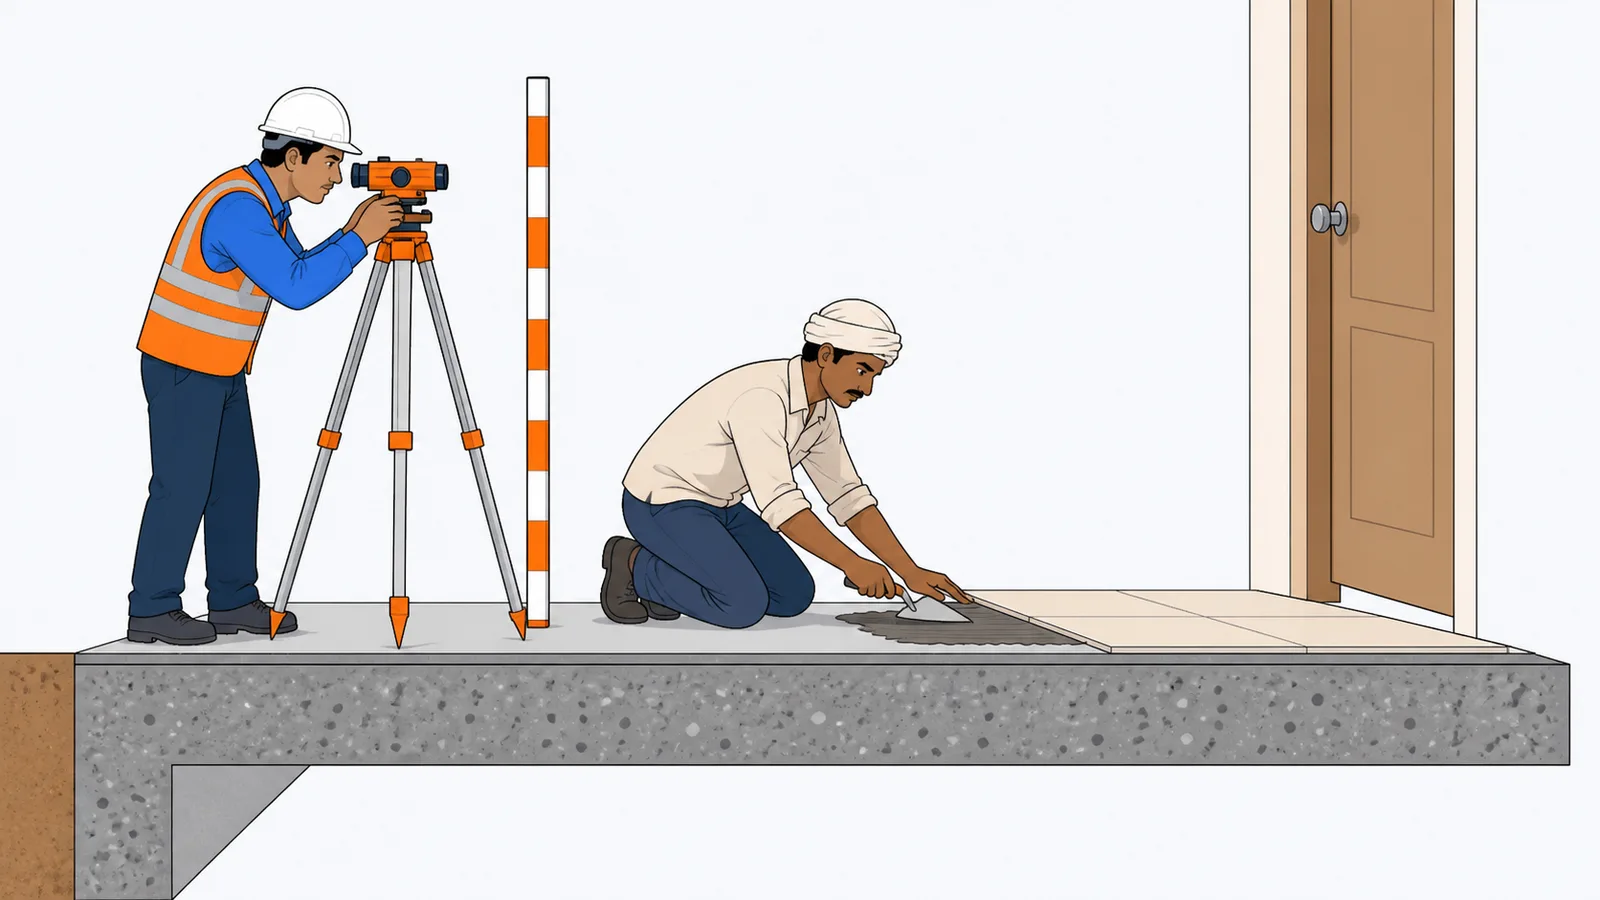
A finishing contractor on a commercial job lays vitrified tile through a lobby, and the main door — ordered and fabricated months earlier — no longer opens over it. Somewhere between the RCC contractor and the finisher, one team read FFL where the other read SSL, and the 50 mm between the two numbers became a ground-down door shutter and an argument about whose bill absorbs it. Levels are the vertical half of the drawing language, and the FFL/SSL pair is where beginners are most reliably burned.
Levels: heights from a datum
A level is a height in millimetres measured from a project datum — the point the project calls 0. On many sheets the datum is written as +/-0.00 at a defined reference; on the Project A ladder below, GRADE LEVEL sits at 0. Levels above datum are positive (+1200), below are negative (-3100). The symbol to know is the level marker: a small circle quartered into black and white segments, with the level value beside it. On sections and elevations these markers stack into a ladder that describes the whole building's vertical logic.
Two definitions, memorised permanently:
- SSL — Structural Slab Level. The top of the bare RCC slab, as cast. This is the shuttering carpenter's and RCC contractor's number.
- FFL — Finished Floor Level. The top of the completed floor finish — tile, stone, screed — where a foot actually lands. This is the architect's, finisher's and door-fabricator's number.
FFL − SSL = the finish package thickness. That difference is deliberate, designed, and different in different areas.
Reading a real level ladder
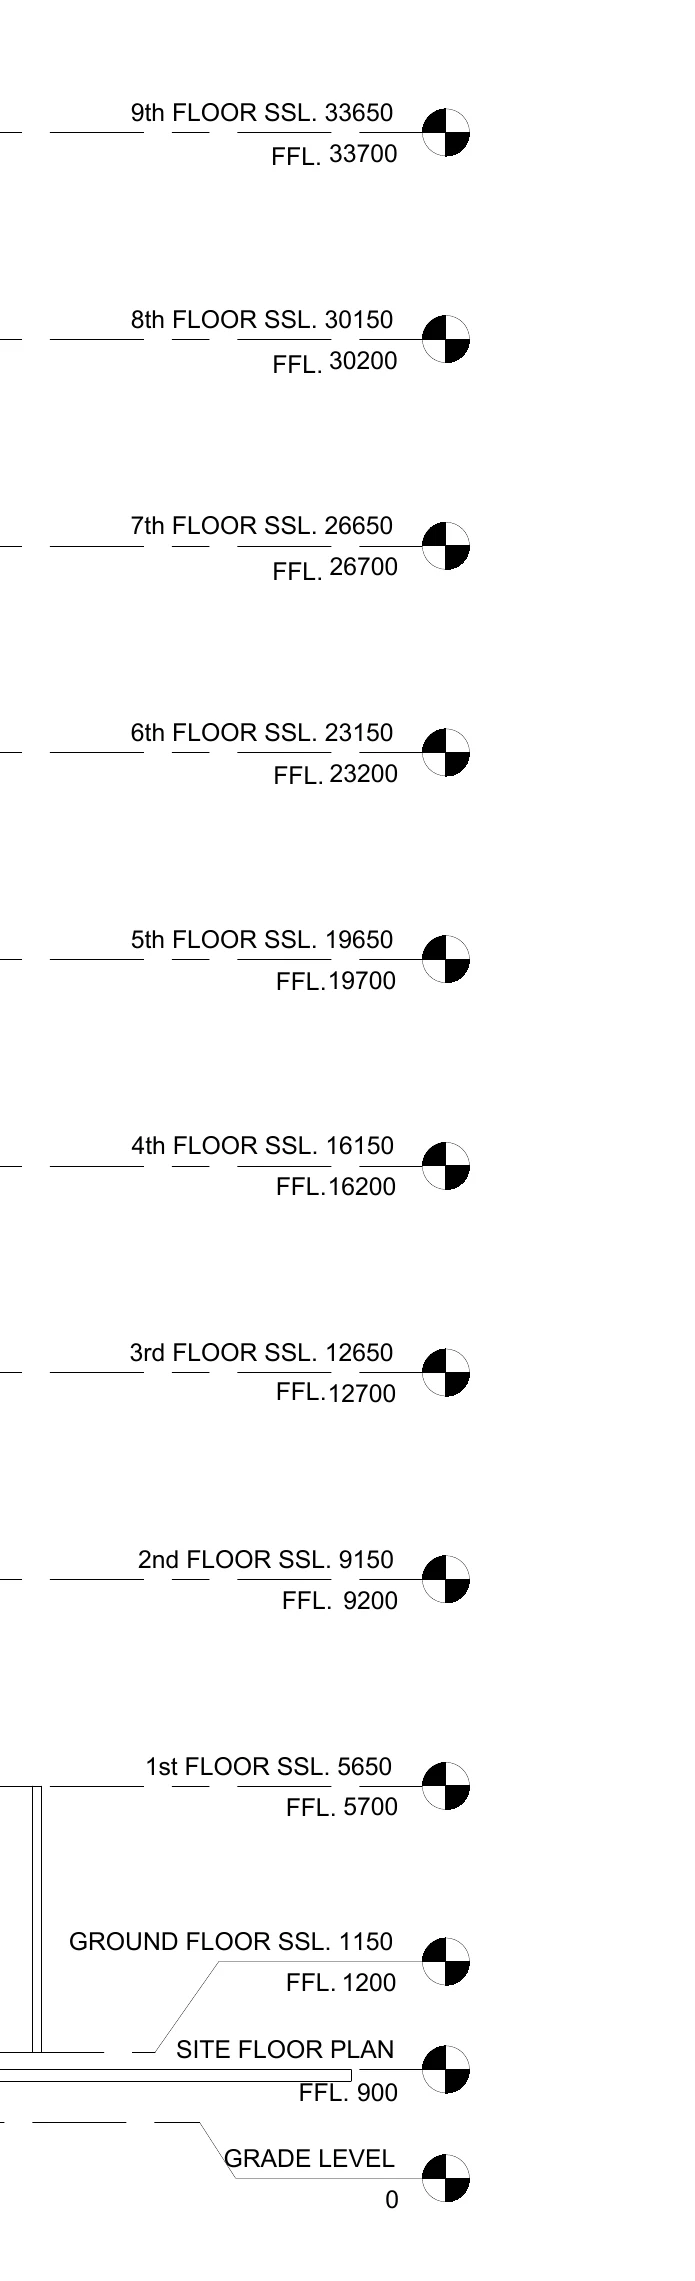
This is the storey ladder from Project A, the nine-storey commercial tower — the canonical SSL-vs-FFL reading exercise:
How to read this
- Start at the bottom: GRADE LEVEL 0 is the project datum, with SITE FLOOR PLAN FFL 900 just above it - the surrounding site finish sits 900 above grade.
- Read GROUND FLOOR SSL. 1150 / FFL. 1200: the structural slab tops out at 1150 and the finished floor at 1200 - a 50 mm finish package.
- Check any other storey the same way: 1st floor 5650/5700, 5th floor 19650/19700, 9th floor 33650/33700 - the 50 mm zone is constant on this project.
- Compute floor-to-floor heights FFL-to-FFL: 5700 - 1200 = 4500 for the taller ground storey, then 9200 - 5700 = 3500 for typical floors above.
- Note the symbol at each level: the circle quartered black and white is the level marker; SSL reads above the line, FFL below.
Work the numbers, because they teach three separate things:
| Floor | SSL | FFL | Finish zone (FFL − SSL) | Floor-to-floor (FFL to FFL) |
|---|---|---|---|---|
| Ground | 1150 | 1200 | 50 | — |
| 1st | 5650 | 5700 | 50 | 4500 |
| 2nd | 9150 | 9200 | 50 | 3500 |
| 3rd | 12650 | 12700 | 50 | 3500 |
| 4th | 16150 | 16200 | 50 | 3500 |
| 5th | 19650 | 19700 | 50 | 3500 |
| 6th | 23150 | 23200 | 50 | 3500 |
| 7th | 26650 | 26700 | 50 | 3500 |
| 8th | 30150 | 30200 | 50 | 3500 |
| 9th | 33650 | 33700 | 50 | 3500 |
First: every storey here carries a 50 mm finish zone — this project has standardised a thin finish package. Second: floor-to-floor height is read FFL-to-FFL (or SSL-to-SSL, same answer when the finish zone is constant): a taller 4500 ground storey, then 3500 typical floors. Third: below the building sit two more datums — SITE FLOOR PLAN FFL 900 and GRADE LEVEL 0 — the entrance sits 1200 above grade, which is why there are entrance steps and an accessible ramp at all.
The 50/150 logic: why the finish zone changes
The finish zone is a stack-up you should be able to build from trade knowledge:
- 50 mm zone (thin package): vitrified tile about 9–10 mm + adhesive or thin screed bed about 40 mm = about 50 mm. Standard for offices, corridors, most rooms — and exactly what the Project A ladder shows.
- 100–150 mm zone (thick package): stone flooring (18–20 mm granite or kota) on a 30–40 mm mortar bed, over a levelling screed; or floors where pipes and conduits must run within the finish zone. Entrance lobbies, toilets and utility areas commonly need 100 to 150 mm.
- Toilets often go further: the slab itself is sunken (dropped locally, often 150–300 mm in Indian practice) so floor traps and drain piping run above the slab but below FFL. Regional practice varies — some markets now prefer shallow sunken slabs with shower channels; confirm on your project's sections.
Worked example: one FFL, three SSLs
The architect fixes ground-floor FFL at +1200 throughout. The finishing schedule says: corridors in vitrified tile (50 package), entrance lobby in granite on mortar (100 package), toilets sunken with a 150 package. The RCC drawing must therefore cast three different SSLs:
| Zone | FFL (fixed) | Finish package | Required SSL |
|---|---|---|---|
| Corridor | +1200 | 50 | +1150 |
| Lobby | +1200 | 100 | +1100 |
| Toilet | +1200 | 150 | +1050 |
Now price the classic error: the RCC team casts the whole plate flat at +1150. The corridor is fine. The lobby granite has only 50 mm to fit a 100 mm package — so 50 mm of set concrete must be chipped off the lobby slab. Chipping and re-levelling RCC costs roughly ₹80–150 per sqft at indicative mid-2026 labour rates (always use current local quotations); on a 600 sqft lobby that is ₹50,000–90,000 of pure rework, plus debris removal, plus a week of lost time — against zero cost for reading two numbers correctly before the pour. Note this cuts the other way too: casting low "to be safe" wastes money silently, because the gap gets filled with extra screed the contractor quietly bills. In the RERA era, where handover levels and accessible entrances are checkable obligations, the level sheet is not a suggestion.
Whose number is whose: the shuttering and RCC teams work to SSL; door frames, tiles, sanitary fixtures, staircase risers and ramp slopes work to FFL. Every trade instruction you give should name which one you mean.
Spot levels and slopes: the ramp excerpt
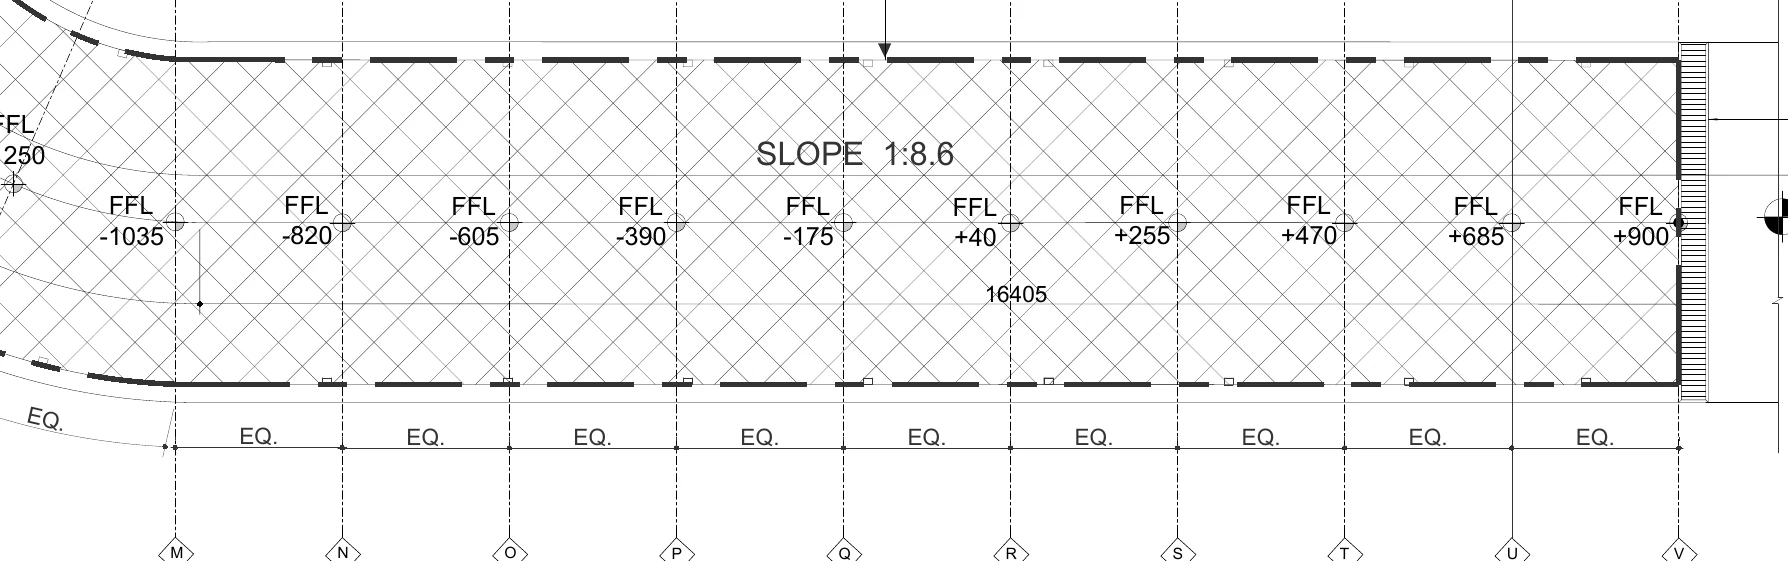
Plans cannot show a slope the way a section can, so they use spot levels — FFL values marked at points along the surface. Here is the accessible ramp from Project A:
How to read this
- Find the diamond grid bubbles M through V along the bottom, with EQ. marked in every bay - the grids are equally spaced.
- Read the spot levels across the ramp: FFL -1035, -820, -605, -390, -175, +40, +255, +470, +685, +900.
- Subtract any adjacent pair: -820 minus -1035 = 215 mm. Every bay rises exactly 215 - a uniform slope, and a built-in error check on each spot value.
- Total the rise: from -1035 to +900 is 1935 mm across nine bays (9 x 215 = 1935).
- Read the SLOPE 1:8.6 label: 1 mm rise per 8.6 mm run - so each 215 rise needs about 215 x 8.6 = 1849 mm of run, which is the EQ. bay width.
- Note the cross-hatch covering the ramp surface - the slope hatch pattern the next lesson's legend decodes.
The ramp runs between diamond grid bubbles M through V at equal (EQ.) spacing, with a spot FFL at every grid: -1035, -820, -605, -390, -175, +40, +255, +470, +685, +900. Subtract any adjacent pair: -820 − (-1035) = 215 mm rise per bay, perfectly uniform — ten values, one arithmetic pattern. Total rise from -1035 to +900 = 1935 mm. The label SLOPE 1:8.6 states the gradient: 1 mm of rise per 8.6 mm of run. Cross-check it yourself: at 1:8.6, a 215 rise needs 215 × 8.6 = about 1849 mm between spot levels — so the EQ. bays should be about 1.85 m each. This is how you verify a ramp on site: measure the run between two points, level the drop with a tube level or auto level, divide, and compare with the drawing's stated slope. (For context: Indian accessibility guidance generally asks for much gentler ramps, around 1:12 or flatter, for wheelchair routes; steeper ratios like 1:8.6 are typical of vehicular and service ramps — read the ramp's purpose off the plan before objecting.)
Protecting your bill with levels
Levels are money at three specific moments:
- Blockwork and plaster billing — wall heights are measured slab to slab (SSL to SSL of successive floors, less beam depths). A biller who uses FFL-to-FFL where finish zones differ between floors inflates or deflates every wall quantity.
- Plinth and earthwork disputes — fill and excavation quantities hang off grade level and plinth level. Get the benchmark transferred to a permanent structure (a column stub, a compound wall) in paint, dated and photographed, before excavation erases every reference.
- Handover measurements — joint measurement of finished levels against the drawing's FFL protects both sides. A dated level sheet signed by the thekedar's supervisor and your engineer ends most "the slab was always low" arguments before they start.
Common mistakes
- Giving one number to two trades — the RCC team needs SSL, the door fabricator needs FFL; saying "floor level is 1200" to both plants the seed of the ground-down door.
- Assuming the finish zone is constant everywhere — it is 50 on this ladder, but lobbies, toilets and terraces routinely differ on the same project.
- Reading floor-to-floor as SSL of one floor to FFL of the next — mixing the pair across floors adds or drops the finish thickness from the storey height.
- Trusting a single spot level — verify the pattern (like the ramp's uniform 215 steps); a mistyped spot level exposes itself against its neighbours.
- Losing the site benchmark to excavation because it was marked on a boundary peg instead of a permanent structure.
What this sets up
You can now read where things are in all three axes — grid for plan position, level for height. Next we decode the graphics themselves: the line types, hatches and symbols that let one sheet say brick, concrete, slope, centreline and hidden edge without a single word.
Key takeaways
- SSL is the top of the bare structural slab; FFL is the top of the finished floor - and FFL minus SSL is the designed finish package.
- Thin tile packages need about 50 mm; stone floors and areas with in-floor services need 100-150 mm, so SSL must drop where finishes thicken even though FFL stays constant.
- RCC and shuttering teams work to SSL; doors, tiles, fixtures and ramps work to FFL - name the right number to the right trade every time.
- Read floor-to-floor heights FFL-to-FFL (4500 ground, 3500 typical on the Project A ladder); mixing SSL and FFL across floors corrupts storey heights.
- Spot levels encode slopes on plans: uniform steps (215 mm per bay on the ramp) cross-check both the levels and the stated slope ratio (1:8.6).
- Protect the benchmark and sign joint level sheets - level records decide blockwork billing, earthwork quantities and handover disputes.
Verify on site
- Transfer the project benchmark to a permanent structure in paint, dated and photographed, before excavation.
- Before any slab pour, confirm the zone-wise SSLs against the finish schedule - flag any area whose finish package is not the standard one.
- Issue SSL to shuttering/RCC teams and FFL to finishing/door/fixture teams in writing, never a bare 'floor level'.
- Check sunken-slab zones (toilets, utility) are actually dropped before steel is fixed, not discovered after casting.
- Verify ramp and drainage slopes by levelling two spot points and dividing rise by run; compare with the drawing ratio.
- Record finished floor levels jointly with the contractor at each stage bill and get the sheet signed.
Check your understanding
5 questions. Answering them marks this lesson complete — results stay on your device.
Want the free certificate?
The whole course is free and open — no signup needed to learn. Enter your details only if you want us to track your progress on this device and issue a named certificate after the final assessment.