Capstone: Find Every Discrepancy
Lesson 32 of 32 · 7 min read
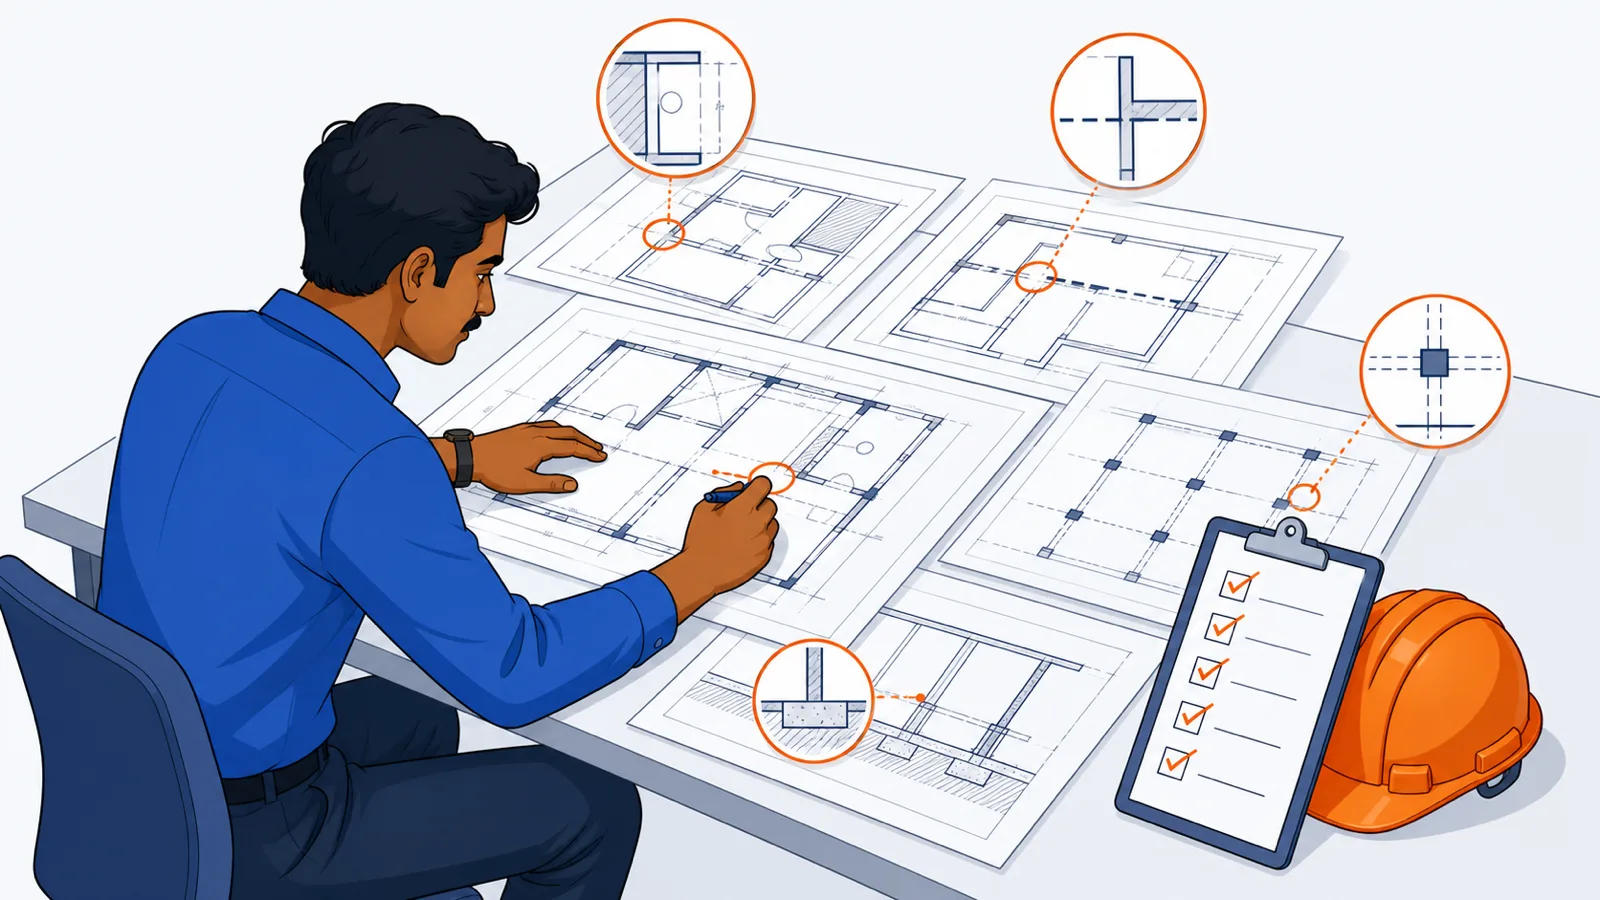
This is the exam before the exam. No new theory — only drawings, questions, and reveals. Work each exercise the honest way: look at the excerpt, write your answers on paper, and only then read the reveal. The final assessment that follows this module covers the whole course; this capstone warms up exactly the muscles it will test.
Both drawings below are from Project B, the multi-tower residential project — a different consultant, a different drafting style, and therefore a fair test of whether you learned drawings or just learned Project A.
Exercise 1: the formwork sheet
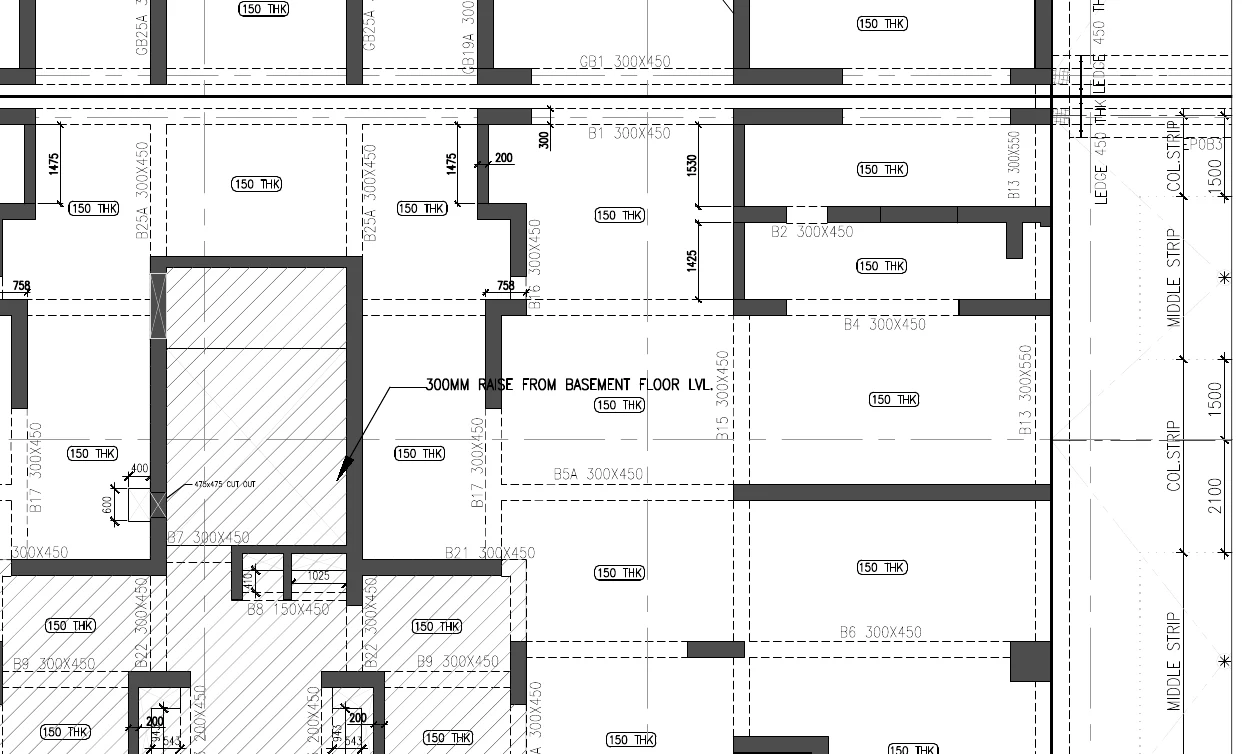
A shuttering (formwork) layout for a basement slab. The carpenter's drawing: it says what to build the moulds like, not what steel goes inside them.
How to read this
- Scan the beam marks and sizes: B1, B2, B4, B5A, B6, B7, B9, B15, B17, B21, B25A and the GB series all read 300X450 — the plate's default beam.
- Hunt the exceptions: B13 300X550 (100 mm deeper soffit) and B8 150X450 (half width). On a repetitive plate, exceptions are where mistakes and money hide.
- Read the oval tags: 150 THK marks the slab panel thickness the shutter must support; the right-hand margin strips are labelled COL.STRIP and MIDDLE STRIP with a 450 THK ledge note.
- Find the leader note 300MM RAISE FROM BASEMENT FLOOR LVL. pointing into the hatched panel — that panel's soffit and finished slab sit 300 mm above the surrounding floor, so props and form edges step up.
- Locate the 475x475 CUT OUT callout — a builders-work opening to box out before the pour.
- State what is absent: not one bar of reinforcement, no concrete grade, no services. Formwork drawings define geometry only; the rebar and services sheets complete the picture.
Your tasks — answer before reading on:
- Most beams on this plate share one size. What is it — and which beam marks break the pattern?
- What does the note 300MM RAISE FROM BASEMENT FLOOR LVL. mean for the shuttering crew, physically?
- There is a small opening called out near the hatched zone. Find it and state its size.
- Name three questions this drawing cannot answer, however long you stare at it.
Reveal:
- The plate's default beam is 300 x 450 — B1, B2, B4, B5A, B6, B7, B9, B15, B17, B21, B25A and the GB-series all carry it. Two marks break the pattern: B13 at 300 x 550 (100 mm deeper — its soffit hangs lower, and a crew that forms it at the "usual" 450 has built a structurally deficient beam) and B8 at 150 x 450 (half-width — form it at 300 and you have doubled its concrete and blocked something the designer kept clear). On a plate where a dozen marks share one size, the exceptions are exactly where the money hides. Your eye should now snag on them automatically.
- The hatched panel is cast with its soffit — and therefore its finished slab — 300 mm above the surrounding basement floor level. The shuttering crew must set that panel's props and soffit boards a full 300 higher, with a form edge at the step. Miss the note and you cast a flat slab, then argue about who pays for the 300 mm screed mountain or the demolition.
- A 475 x 475 CUT OUT, called out with a leader in the raised zone — a builders-work opening that must be boxed out before the pour, for exactly the reasons Lesson 2 priced.
- Among many: What reinforcement goes in the slab and beams? (Not here — the rebar sheets govern.) What concrete grade? (General notes/structural notes.) Where do embedded conduits and sleeves run? (Services overlays.) A formwork drawing defines geometry, and geometry only. The 150 THK oval tags give slab thickness, the ledge note gives a 450 thickness at the edge strip — but not one bar of steel.
Exercise 2: the reinforcement half
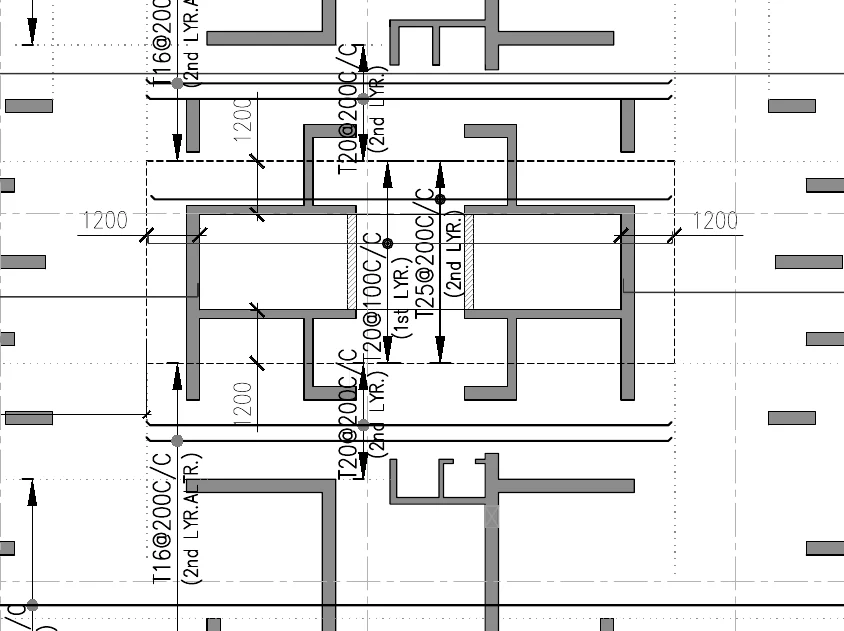
Now the same family of structure seen through the other lens — a raft slab's reinforcement plan around a tower core, from the sheets you first met in Module 4.
How to read this
- Start at the core zone's stacked callouts: T20@100C/C (1st LYR.) is the bottom-most steel; T25@200C/C (2nd LYR.) rides above it — stacked layers, not alternatives.
- Follow the band callouts outward: T20@200C/C (2nd LYR.) repeats along the zone edges above and below the core.
- Measure the extents: the repeated 1200 dimensions bound where the heavy core-zone bars stop and the general raft mesh resumes — these set BBS cut lengths and counts.
- Decode the tricky one: T16@200C/C (2nd LYR.ALTR.) — 16 mm bars at 200 centres, second layer, alternating with the neighbouring set. Misreading ALTR halves or doubles the steel.
- Connect the lenses: the shuttering plan told you the mould; this sheet tells you the steel inside it; neither alone is enough to pour.
Your tasks:
- What is the bottom-most steel in the heavy core zone — dia and spacing?
- What does (2nd LYR.) add to a callout, and why does the raft need it?
- The zone boundary carries repeated 1200 dimensions. What are they telling the bar-benders?
- One callout reads T16@200C/C (2nd LYR.ALTR.). Decode it fully — and state the money risk of misreading ALTR.
Reveal:
- T20@100C/C (1st LYR.) — 20 mm high-yield bars at 100 mm centres, first (bottom-most) layer in that direction.
- Rafts under tower cores carry moments too large for one mesh, so steel stacks in layers: here T25@200C/C (2nd LYR.) rides above the first layer, and further T20@200C/C (2nd LYR.) bands appear beyond the core zone. A fixer who reads two callouts as alternatives instead of stacked layers places half the steel; a checker who cannot tell layers apart cannot count bars against the BBS.
- The 1200 dimensions bound the extra-steel zone — they tell you where the heavier core-zone bars stop and the general raft mesh resumes. In BBS terms (Module 4), those extents set the cut lengths and the count of the extra bars; on site they are where your tape goes during the checking-steel walk.
- T16@200C/C (2nd LYR.ALTR.): 16 mm bars at 200 centres, second layer, placed as alternate bars — interleaved with the neighbouring callout's bars, not a complete mesh on their own. Misread ALTR and you either halve the steel (reading the two interleaved sets as one) or double it (providing both at full spacing) — on a raft, that swing is tonnes of steel either way, and either an unsafe slab or a steel bill nobody sanctioned.
The pairing lesson — say it in one line each:
- The formwork drawing answers: what shape, what size, what level, what openings.
- The reinforcement drawing answers: what steel, what spacing, how many layers, where extents stop.
- Neither answers: where services cross, what grade to pour, or in what sequence — which is why the overlay habit from Module 6 and the notes discipline from Module 3 stay in the loop, and why every pour needs more than one sheet on the table.
Exercise 3: rapid-fire recap
Five families of discrepancy crossed this module. One drill line each — cover the answer column and test yourself:
| You see | The family | Your move |
|---|---|---|
| Title says B2; ramp note says DN TO B2; stair rise lands at LG | Title vs content | RFI quoting both facts; build from neither until answered |
| SHOP 05 beside SHOP L0204 | Format inconsistency | RFI: which numbering scheme governs the set? |
| 1600KVA TRANSFROMER inside a change cloud | Spelling vs data slip | Verify 1600 against the SLD; log the typo for reissue |
| Register rows and dates that do not line up with the title block | Revision-register slip | Hold the sheet; confirm the governing revision (Module 5) |
| Lift/shaft rows sum 468.89; printed total 471.07 | Totals slip | Re-add, cross-prove from sibling columns, RFI the 2.18 |
Every one of these came from live, issued sheets on real projects — and every one was findable in minutes with the checks you now own. That is the honest state of construction documentation, and it is fine: sets are made reliable not by being perfect but by being checked.
Your discrepancy register
From tomorrow, keep one running register — a page in your site diary or a simple sheet:
Date, sheet + revision, location, what disagrees (both facts quoted), RFI reference, status, and cost-if-missed. That last column is worth filling even roughly, because it turns your register into your appraisal: run the numbers from this module alone — a Rs. 12,000-16,000 hume-pipe save, a Rs. 75,000-95,000 cable-bill query, a beam that would have been recast. An engineer whose register shows a few lakh rupees of catches a year is not a complainer; they are one of the cheapest risk-management systems their company owns — and in a RERA-era dispute, that dated register is evidence money cannot buy after the fact.
Where to go from here
The eye is trained; keep it fed. Re-run these checks on your own project's set this week — every set has its basement mislabel somewhere. If you work across large sets, this habit is also where software honestly helps: tools like SiteSetu can overlay two revisions of a sheet and highlight what moved, and link drawing quantities to BOQ lines so a revision delta surfaces as a billing delta instead of a surprise. The judgment — what matters, what to query, what to hold — stays yours; the tool only shortens the search. And if you have not yet taken the QS course that this module kept shaking hands with, the billing side of everything you just learned lives at /learn/planning-billing-control/ra-bills-progress-billing.
One thing remains: the final assessment — 25 questions across all seven modules. You have read real sheets from two live projects, proved a floor from a stair, audited a table against itself and priced the cost of not looking. Go pass it.
Key takeaways
- On a repetitive plate, the exceptions carry the risk: among a dozen 300x450 beams, B13 at 300x550 and B8 at 150x450 are exactly where a formwork crew goes wrong.
- A formwork drawing answers geometry only — sizes, thicknesses, level steps, openings; the reinforcement drawing answers steel only; every pour needs both plus the services overlay.
- Layer qualifiers (1st LYR. / 2nd LYR.) and the ALTR alternate-bar convention are the two raft callouts whose misreading halves or doubles steel by the tonne.
- The five discrepancy families — title vs content, format inconsistency, spelling vs data slips, revision-register slips, totals slips — all close the same way: both facts quoted, RFI raised, register updated.
- A dated discrepancy register with a cost-if-missed column is both your dispute evidence and your professional appraisal.
- Software (drawing-revision diffs, drawing-to-BOQ links) shortens the search for discrepancies, but the judgment of what to query remains the engineer's.
Verify on site
- On any repetitive plan, list the default size or spec first, then hunt every mark that deviates from it before work starts.
- Read every leader note on a formwork plan aloud to the shuttering supervisor — level raises and cutouts hide in notes, not linework.
- Check fixed steel against layer and ALTR qualifiers, not just dia and spacing; count bars in one metre and compare both interleaved sets.
- Tape the extra-steel extents (the 1200-type dimensions) during the checking-steel walk — extents wrong means BBS quantities wrong.
- Bring formwork, reinforcement and services sheets to the same pre-pour review; sign off only when all three agree.
- Update the discrepancy register the same day as every find, with sheet, revision, RFI number and an honest cost-if-missed estimate.
Check your understanding
5 questions. Answering them marks this lesson complete — results stay on your device.
Want the free certificate?
The whole course is free and open — no signup needed to learn. Enter your details only if you want us to track your progress on this device and issue a named certificate after the final assessment.